

This project came about because I realized I needed a purse that was a little more suitable for professional occasions, so I thought I would try making up a cute pattern that was a little on the subdued. I’m not quite sure if I got exactly to that mix of professional with subtle cute, but it was fun trying nonetheless! I used some extra corduroy to make this particular purse, and I think the dark reddish brown does a good job of looking stylish without being too over the top.
For this particular project I tried out a lot of new interfacing to see how it stacks up for stabilizing thin corduroy. You could leave it out as you prefer, of course, but I think the Pellon 50 I used did a good job of making thin corduroy into something more substantial. The lining includes several side pockets as well as a hidden zippered pocket. I ran out of strap adjusters by this point, so I tried out using a buckle instead. A little unorthodox, but I think I like it! Maybe you will too 😀

Difficulty:
![]()
This bag has a lot of bells and whistles as well as layers of interfacing to make everything feel sturdy, so it will be quite hard for beginners.
Makes one 12” x 11” x 3” purse
Materials & Tools:
• 2/3 yd. of 45” wide or 1/2 yd. of 60” wide medium weight fabric (I used interfaced corduroy)
• 2/3 yd. of lightweight fabric for lining (I used quilting cotton)
• 1 1/4 yds. of lightweight fusible interfacing (I used Pellon SF-101)
• 3/4 yd. of heavyweight sew-in interfacing (optional; see step 16) [I used Pellon 50]
• 1/4 yd. of thin cotton quilt batting (optional; see step 7)
• 10” zipper (at least)
• 1 1/4” wide buckle
• Five 1/4” eyelets
• 1/2” wide sew-in snap
• Matching sewing thread
• Basic sewing tools (sewing machine, scissors, iron, needles, pins, fabric marker, seam ripper)
Appliqué supplies:
• 4” x 6” of white appliqué fabric
• 4” x 6” of light or heavy duty fusible web
Before you begin:
1. Print out the project pattern here
2. Assemble the pattern pieces, see the page here for more help
3. Lay out the pattern pieces on your fabric and interfacing and cut them out
4. Mark the fabric pieces with the markings from the pattern
The Inner Bag

1. To break up the length of this project, we’re going to focus on the inner bag first. First is installing the hidden zipper in the back lining of the bag. To start, layer one of the hidden pocket pieces over one of the lining pieces with right sides facing. Line up the pattern guidelines that show where the zipper opening must be sewn, then sew around that rectangle.

2. Turn this area right side out by cutting a slit down the middle of the rectangle, then cut diagonally into the corners as close as you can without actually cutting the threads.

3. Push the hidden pocket fabric through the hole so the fabrics flip over to the other side. You should now have a neat little rectangular hole from the seam sewn in step 1. Press it nice and crisp to prepare for the next step.

4. To install the zipper, lay it facing down onto the hidden pocket fabric so the right side peeks through the rectangular window. Pin the zipper in place along the edges, or if that’s a pain it helps to tape it in place or use a glue stick. Be sure the zipper slider is in the middle of the window, then sew as close as you can around the edge of the window, being careful when going over the zipper teeth.

5. To finish the pocket, take your remaining hidden pocket piece and place it on top of the one attached to the lining (right sides facing). Line up the edges and sew around the perimeter using a 1/4” seam allowance. You’ll need to push the lining fabric out of the way a bit to do this. That completes the hidden pocket!

6. The lining also has a few sewn-in pockets as well, so we’re going to tackle those next. Begin by taking two of the lining pocket pieces and lining them up along the top straight edge. Sew them together along this edge, then press the seam and turn it right side out.

7. I wanted to try a technique I’ve seen used by some other bloggers to add a bit more stability to my pocket, so this is where I cut a bit of quilting cotton the same size as one of the pockets without seam allowances. Tuck it in between the pocket pieces and anchor it in place by topstitching the previous seam from step 6. You could skip the batting if you feel it isn’t necessary.

8. When complete, baste the pocket to your freshly sewn lining piece (the one with the installed zipper). Line it up against the bottom and sew it along the sides. Here’s where you might also want to sew some divisions depending on what sort of things you carry; pencil pockets, phone pocket, keys, etc.

9. Repeat steps 6-8 with the remaining two pocket pieces and lining piece. When the pocket is all sewn up and topstitched, baste it to the bottom of the lining piece just as before.

10. All that’s left to complete both sides of the lining is to add the inner facing. The inner facing has a bit of interfacing fused for the sake of stability. So if you’re using fusible interfacing on your bag, apply the lightweight fusible to your inner facing at this time.

11. Once the inner facing is all ready to go, you can sew it to your lining pieces. Line up the straight edges as shown and sew along that edge. Leave a gap in one of them as the pattern guidelines indicate so you can turn the bag right side out later. When complete, press the seam open.

12. All that’s left to do for the lining is connect the front and back sections via the gusset. The gusset will need to stretch around the curved bottom of the lining, so it helps to make small 1/4” or so clips into the seam allowance every 2-3” or so. When pinning the gusset, you’ll find that the circle markings in the corners should line up with the seam you just made in step 11. Once everything is all lined up and nice, sew it in place. Repeat this with the other side of the gusset and the remaining lining piece and your lining is all finished!
The Outer Bag

13. Onto the outer bag! First up of course is applying more interfacing. I used more fusible lightweight interfacing on the front and back since it’s made from rather thin corduroy. Iron yours in place now if you’re doing the same.

14. Next up I added the little whiskers that really help bring together the kitty look of the bag. Trace the whisker outline onto your fusible web, iron the fusible web to your appliqué fabric, cut out the shapes, then fuse the appliqué fabric to what will be the front of the bag. If you use heavy duty fusible web you can leave it as is, but if you used lightweight fusible web you’ll want to sew the whiskers in place around the edges. I used a simple straight stitch to give it a clean look.

15. Now to handle the outer gusset. Apply lightweight fusible interfacing to this piece as well if you’re using flimsy fabric like me. Iron it fully before going onto the next step.

16. Up next is to attach the outer front to the outer back of the purse via the gusset again. For extra stability, both the gusset and the front/back use additional sew-in interfacing. For this step, pin the interfacing to the corresponding pieces and treat them as if they were one, then pin the gusset around the bottom of the purse front just as in step 12. Again, you should see the circle markings match up and you’ll likely want to clip the seam allowances to have more give as you pin.

17. Repeat the previous step with the other side of the gusset and the purse back. To make the bulk easier to manage, trim away all the heavy sew-in interfacing from the seam allowances in the previous seams.

18. Next up, cut notches into the remaining seam allowance every 2-3” or so.

19. Now all of that seam allowance left over is going to go towards the gusset to give it extra strength. Fold the seam allowance towards the gusset and edge stitch the gusset from the right side of the bag to anchor the seam allowance in place. Repeat this on the other side of the gusset as well.
The Extra Bits

20. The first thing we’re working on for this section is the strap. Like with all the other parts, apply the lightweight fusible interfacing to the wrong side of your strap fabric. The interfacing should not include seam allowances so as to reduce bulk, so when it comes time for sewing you can simply sew around the interfacing.
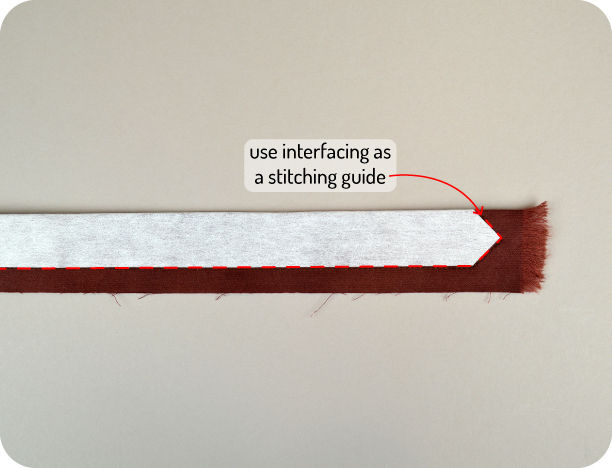
21. Fold the strap in half with right sides facing and sew down the length of it, using the interfacing as a guide. When finished, trim the excess seam allowance at the corners, turn the strap right side out (a yardstick or long dowel works nicely for this), and press the whole thing flat.

22. When the strap is all turned and pressed, edge stitch around the finished piece to give it a polished look. After that, trim off 4” of the strap to use for the buckle tab later.

23. Unless you’ve got a center bar buckle, your buckle will need an additional loop to hold onto the strap when everything is buckled in. To make one of these, take your buckle loop piece and fold one long end 1/3 of the way in and stitch it in place. Fold the other third into the center as well and stitch it with a zigzag stitch to cover the raw edge. Then fold the loop in half with right sides (the side without the raw edge) facing and zigzag across the short edge. Turn the loop right side out when complete and ready to put with your buckle.

24. To prepare your buckle, fold the buckle tab in half and cut a small hole for the buckle tine. Loop the tab through the buckle and poke the tine through the hole. Dab some glue or fray-block liquid on the hole to keep it from fraying too badly. Baste the raw edges of the tab together, then slip the buckle loop over the tab.

25. With the strap and buckle all good to go, you can now attach it to your bag. Line up the raw ends of both the strap and the tab to opposing sides of the bag. Center them along the upper edge of the gusset (make sure the top of the buckle is facing the bag, the bottom side will be facing up) and baste them in place.
Bringing it all Together

26. With the inner purse and outer purse all finished, you can now bring the two together. Slip the lining into the outer bag with right sides facing and sew the two together along the top edge, that is the one with the little kitty ears. Go around the entire perimeter, along the short little side areas as well.
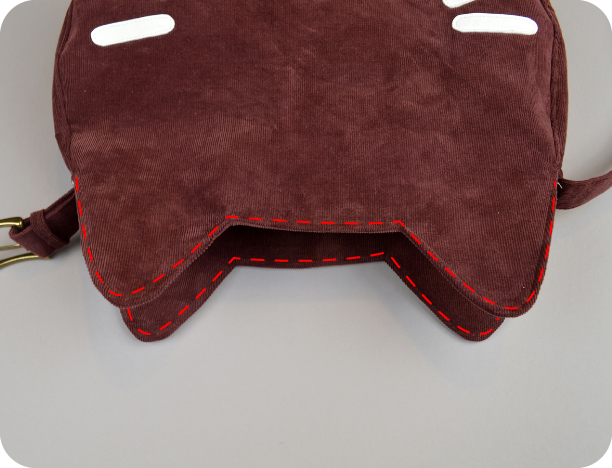
27. Just like in step 17, go back and trim the excess interfacing from the seam allowances and cut notches in the curves like in step 18. Be sure to cut clips in the corners where the front and back meet the side, then turn the bag right side out from the opening in the lining. Press the top edge nice and flat, then edge stitch around the perimeter.

28. Sew the opening in the lining closed and also sew in a snap centered on the inner facing on the inside of the bag. Use the pattern guidelines to get you started, but you might want to shift the placement depending on how your bag turned out.

29. And the very last step is to add eyelets to your strap! Depending on what kind of adjustment you want, space the eyelets accordingly, being sure that the right side of the eyelets are facing the outside of the strap. Mine are spaced about 3” apart.
It’s all finished! There were a lot of steps to this one, but I just love the look of the adjustable buckle strap and all the lovely pockets inside.
If you do try making the project, I’d love to see it! Send me a photo and I’ll send you exclusive free patterns as a reward!
For questions and terms of use information, please see the FAQ.
42 thoughts on “Freebie Friday! Kitty Purse”
Fun.
I like the buckle.
I am in the schoolhouse about your books! Love to hear about you as I love your patterns!
This is adorable and I can’t wait to make my own ^^
Hi 😉 Found your Tutorial on Pinterest and OMG i looove cats and this is such a great Idea!Super awesome!Thans for sharing ♥
I love this, but maybe I’m looking over it, but I don’t find the pattern
Thanks so much! The pattern can be found towards the top of the instructions, right before the step-by-step photos in a section called “Before you begin”
But here’s a link to it as well!
Omg I saw your bag in pinterest . It is so amazing and your tut is very easy to understand I love this cat. Thank u so much for sharing this!!!!!!
Thank you so much! I’m so glad you like it ♥
Hi I am a not new sewer but not a great sewer could you recommended anything?
Sure! I think anything that I’ve dubbed 2-4 stars in difficulty should suit you, especially stuff that doesn’t have a lot of extra fussy details like the Frayed Tote Bag, Ruffled Pouch, Furoshiki Casserole Carrier, Fabric Trays, Triforce Plush, Big Shopping Bag, Hidden Pocket Tote, Zip Top Purse, Bot Bag, Monokuro Boo Bag, or Susuwatari Tote
Thank you sooo much for this pattern! I’ve sewn it today and am absolutely happy 🙂
I’ll upload some pictures today or tomorrow, maybe you like to look at it.
https://www.facebook.com/cottonandcandy
Love, Jasmin
I’m so glad you like the pattern! And I can’t wait to see your pictures!
I so need that bag!
Hi, just wanted to let you know that I linked to your tutorial on my blog: http://www.sewingshop.net/blog/thursday-treasures-1-theme-cats/
Great pattern and tutorial!
Thank you so much! You have a fantastic blog 😀 It’s an honor to be featured!
You’re very welcome and thank you for the nice words!
Très charmant chat. My grand-daughter, who is 3 years old, loves purses. I shall sow this cat for Christmas.
Thank you very much to share for all of us your pattern.
MIMIYOYO
Reblogged this on Mil Respostas.
Wowwww thank you so very much for sharing your patterns! they are very professional and clear and easy to follow! here is my version: https://www.pinterest.com/pin/481111172671248388/
i’m planning to make the london calling bag too
It looks fantastic! ^O^ I can’t wait to see your next bag! ♥
This is so cute! I am a little confused about step 19 – do you hand sew it? I have so far been able to use my machine for everything but can’t understand how to do this on the machine.
Thank you!
Step 19 was actually done with my machine 🙂 It’s a little tricky to get it under there, so it took a lot of shifting.
It’s not absolutely crucial to do though, I just found it helped me because my seam allowances were a little bulky (with all that interfacing) and it was nice to get it flattened and out of the way.
So if you think your bag looks fine without the edgestitching you can probably skip it 🙂
Thank you! I chose to skip it. I will post a photo when I’m done (waiting for the buckle I ordered to arrive!)
Here’s mine! http://tinypic.com/r/2hxoead/8 I love it!
Thank you very much for this excellent pattern!
I made myself a bag and I love it: http://lafamillecreative.blogspot.fr/2015/11/patron-gratuit-kitty-purse-un-projet.html
Oh my gosh! That looks amazing! Thanks so much for sharing the link with me 😀 I can’t believe you made it out of an old skirt! Too cute!
I’m not into cats, and I think it will look fine without the ears!
I have been making bags like this for years (like a pillow with a gusset) but never knew how to do it correctly. Thanks so much!
What a fun bag!
Would it be possible to use pleather instead of the corduroy? I’m worried about turning the ears inside out with the pleather and the sheer amount of layers when sewing the lining to the outside pleather cat.
Hm, I think it depends a lot on how thick and stiff your pleather is. I’ve used some that were surprisingly flexible, so you could test a small bit to see how well it turns right side out with sharp corners.
If it’s very thick, you could try sewing it with the seams exposed much like some designer leather handbags are done 🙂
http://cdn1.picvpicimg.com/pics/5323842/tods-mini-d-bag-shoulder-bag.jpg
Cute purse.. thanks for the pattern..
OMG! It is super cute! I will make it! :3
Thank you sew sew much for this adorable cat bag pattern! I’ve already made it for my daughter. I’ve used rayon out of an old dress. It turned out pretty nice. The instruction was very easy to follow even for me. My next project going to be Neko atsume kitties!
I’m so glad it turned out well for you! And that you were able to use some old fabric too 😀 Always a plus!
I printed your pattern, but the guide lines don’t match T_T
Oh no! I’m sorry you’re having trouble! I actually just released a new revamped version of the pattern today: https://cholyknight.com/2017/08/10/kitty-purse-2/
So maybe that one will work better for you? In the meantime I’ll see if I can work out the issue with the old one 🙂
Thank you Choly, you are awesome! I had issue with A7 & A8 part. Of course it might be my fault in incorrect printing, I hope I didn’t offend you in any way. I really love all your patterns!
You didn’t offend at all! I appreciate the feedback so I can be sure all the patterns are at the highest quality 😀 Thanks for the kind words about them!
vraiment original et amusant
bravo et merci
Merci beaucoup pour ce partage .Votre tutoriel et votre patron sont supers!!
This is so cute n cool !!! gona try making it with my unused denim skirt :>