
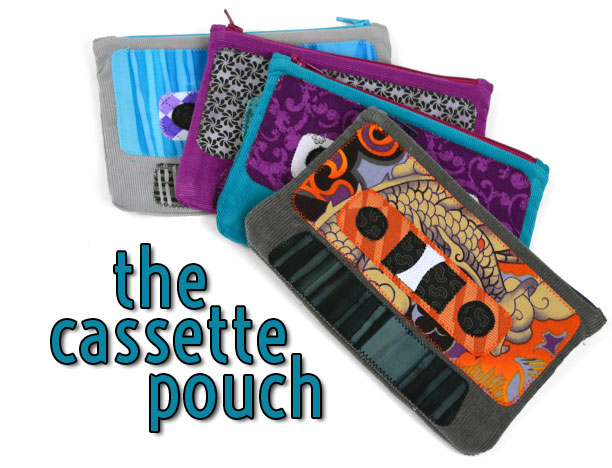
More retro technology today! x3 As a child of the 90s I just had to do something with a cassette motif eventually, so here it is 😀 My stash of heavy duty fabrics is almost gone, so I’ve started to break into my quilting cottons, which I thought would be perfect for all the appliqué you see in the designs here. They’re great for holding pencils of course, but also just about anything else, like makeup or spare change. It’s one of those things you never realized how much you needed until you actually have it ^-^
In addition to clearing out the last of my heavyweight fabric stash, I’m also dipping into my stash of lining fabrics. While I think they’re best used for clothing, I don’t have enough of any particular fabric to actually use for a skirt or blazer or something, so I’m stuck using them for smaller projects like these. Since it’s so flimsy it can be kind of a pain to work with, but I’m trying out some things to get it to behave – maybe you’ll like the method I’ve used here!
Also, as I mentioned in yesterday’s post, I’ll have to start paring down from doing weekly projects every week to about every month or so that way I can catch up with some work I need to do and life in general 🙂 Nothing else about the site will change, so I do hope you’ll keep tuning in often to see what I’ve created!

Difficulty:
![]()
Really basic, though there are French seams and some zippers to deal with if you find those tricky.
Makes one 7” x 4 1/2” pouch
Materials & Tools:
• 1/4 yd. of light to medium weight fabric for case (cotton or light twill would be perfect – I used corduroy)
• 1/4 yd. of lightweight fabric for lining (light cotton would be perfect – I used polyester lining fabric)
• 8” (at least) zipper
• Matching sewing thread
• Basic sewing tools (sewing machine, scissors, iron, needles, pins, fabric marker, seam ripper)
Appliqué supplies:
• 2” x 6” scrap of appliqué fabric for bottom section
• 3” x 7” scrap of appliqué fabric for label
• 2” x 5” scrap of appliqué fabric for middle section
• 2” x 5” scrap of black appliqué fabric
• 2” x 1” scrap of white appliqué fabric
• 8” x 8” scrap of light or heavy duty fusible web
Before you begin:
1. Print out the project pattern here
2. Lay out the pattern pieces on your fabric and cut them out
3. Mark the fabric pieces with the markings from the pattern

1. As per usual, we start with the appliqué. Trace the appliqué patterns to your fusible web, iron them to your fabric, cut them out, then arrange them on your pouch according to the pattern guideline. This part is a ton of fun, getting to choose all the wild colors for the label and everything. And you have every excuse to go crazy with the colors since it just looks more retro 😀 I sewed mine on with a zigzag stitch, but you could also use a straight or satin stitch. Or you could skip the sewing altogether if you’ve used heavy duty fusible web.
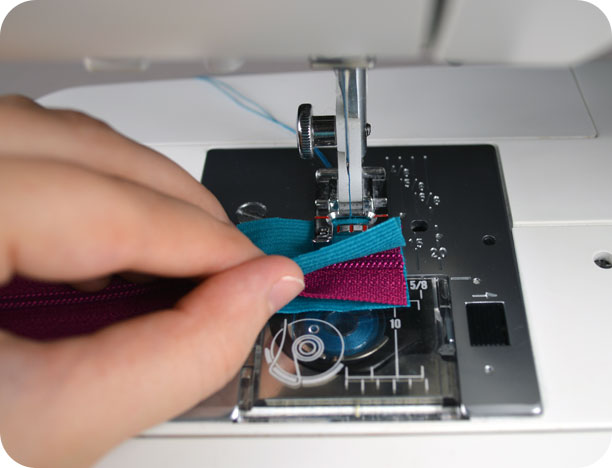
2. Trim your zipper to 7” long, then sew the zipper tabs on the ends: sandwich the cut ends of the zipper between two of the zipper tab pieces and sew through all the layers. This will make the zipper much easier to install into the pouch later.

3. Press the zipper tabs away from the zipper and they should look something like this.

4. To install the zipper, layer the zipper between the outer pouch fabric and one of the lining pieces with right sides facing. Sew all three layers together with a 1/4” seam allowance. When you finish, press the fabric away from the zipper, then repeat the same step with the other side of the zipper and the remaining pouch pieces.

5. A typical pattern such as this would usually have you sew the lining and outer case fabrics separately to finish off the project. I chose to try something different to go along with the flimsy lining fabric I was using. Feel free to try it out to see if the process is for you. If you want to finish the pattern the typical way, steps 10 & 11 of The Zip Top Purse will cover it nicely 😀
Layer all the case fabrics together with lining fabrics facing inward and outer fabrics facing outward – everything should be arranged as if the case were finished. Pin the edges together as precisely as you can, then sew the layers together with a medium width zigzag; a seam allowance at about 1/8”. Go around the perimeter of the case, then trim any excess fabric along the sides, bottom, and corners when you finish.
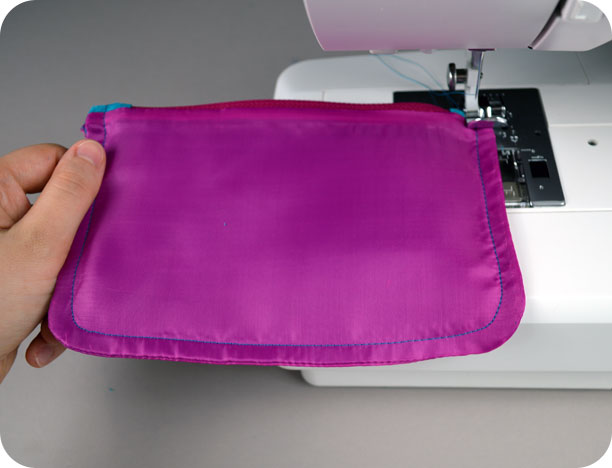
6. To complete the French seam, turn the whole case right side out and press it flat. The goal here is to sew a scant 3/8” seam that will encase your previous seam allowance, so it can be a bit tricky to make sure that seam is completely covered. Once you’re sure you have it, sew along the perimeter of the case as before, and that finishes your cassette tape!
I liked this method because it anchors your lining inside the case, so a flimsy lining such as this made from polyester doesn’t easily turn inside out when you take objects out of it. That happens to me a lot; I’m not sure about all of you :B
Am I driving you all crazy yet with my affinity for retro technology? :B I’ve got quite a collection going, huh?
I hope you’ll give this project a try, but if you’d just like to buy the one in the photos, you can find it on my Etsy.
If you do try making the project, I’d love to see it! And I’ll send you exclusive free patterns as a reward!
For questions and terms of use information, please see the FAQ.
4 thoughts on “Freebie Friday! The Cassette Pouch”
Why you always make it look so easy!!!?? I’m gonna have to try this though. 🙂
Aww >w< thank you! I do hope you get to try it! 😀
Made one myself http://audroniukas.deviantart.com/art/The-Cassette-Pouch-471375842 😀
Looks great! 😀 I especially love the plaid fabric you used. Thank you so much for sharing! ♥