
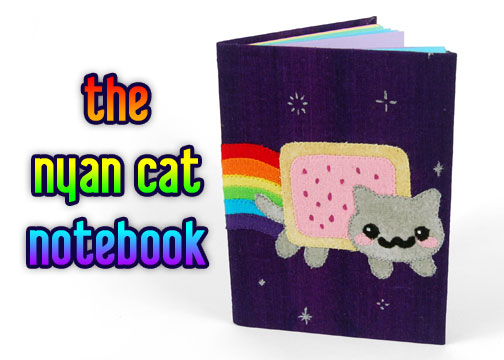
 So are you all the type that loves Nyan Cat or just finds it annoying? I’m the former >w< Sure the song is an addictive and repetitive earworm, but it’s just so darn cute, I can’t help it! I actually made another notebook just like this for my boyfriend a long while back while he was going through a whole bunch of overtime so he’d have something to look forward to when he got home from all that work. The Mario Block Plush was actually one of them, and this was another 😀
I got the idea because I absolutely love bookbinding, though I’m not nearly as skilled at it as I am with sewing. So long back that I barely remember, I bought a multi-pack of rainbow paper. It was for a school project that I don’t even remember the details to XD as I probably just used about 10 sheets and was forced to hold onto the rest. I guess that means I must admit that not only do I have a fabric stash problem, I have a paper stash problem too ;o; To tell the truth not only do I have those papers to get rid of, but a while back I got addicted to buying scrapbook paper stacks that I thought were particularly pretty. You’ll see a sample in steps 10-11. I guess I need to get cracking on more notebooks like this if I want to use up all that stuff.

Difficulty:
![]()
There actually isn’t much sewing involved in this aside from the appliqué, so if you can do that you’re set!
Makes one notebook that’s 4⅜” wide and 5¾” tall and contains 40 pages.
Materials & Tools:
• ¼ yd. of light weight fabric for cover (broadcloth or linen would work – I used quilting cotton)
• ¼ yd. of light weight interfacing
• 8¾” x 5¾” piece of poster board
• 8¼” x 5¼” piece of decorative paper (like scrapbook paper) for inner cover
• 10 sheets of rainbow colored printer paper (I used 2 of each: pink, yellow, blue, green, lavender)
• White, pink, & silver fabric paint
• Rubber cement (optional, but suggested)
• Craft glue for fabric & paper
• Basic sewing tools (sewing machine, scissors, iron, needles, pins, fabric marker, seam ripper)
Appliqué Supplies
• Scraps of appliqué fabrics (cotton, felt, etc.) in various colors: red, orange, yellow, green, blue, purple, cream, pink, gray, black
• 5” x 12” piece of fusible web – either light weight for sewing or heavy duty to skip sewing
Before you begin:
1. Print out the project pattern here
2. Assemble the pattern pieces, see the page here for more help
3. Lay out the pattern pieces on your fabric and cut them out
4. Mark the fabric pieces with the markings from the pattern

1. The first part is prettifying up your book cover with the Nyan Cat appliqué. Apply your fusible web to your fabric, then arrange all the pieces to form the picture. The guidelines on the pattern will help give you an idea of where to place everything as far as layering goes. This part can be a little headache inducing but it’s also kind of fun :B When all your pieces are properly placed, you can iron them all down.
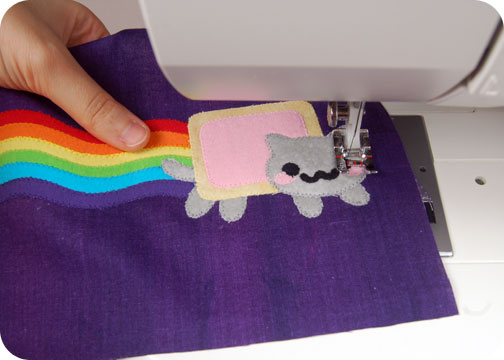
2. If you went with heavy duty fusible web your pieces will stay like that just fine 😀 If you went with light fusible web, you’ll need to sew the pieces in place. I used a quick zigzag stitch around each shape so the stitches don’t overwhelm the fabric pieces.
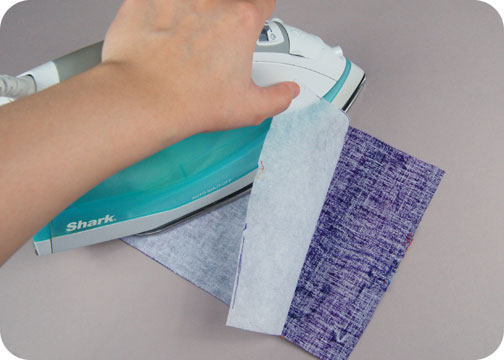
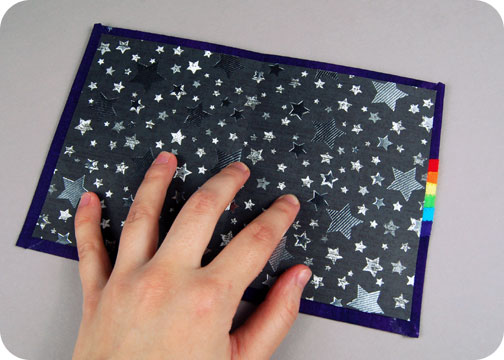
3. To make the next steps easier, you’ll want to reinforce the fabric. Take your interfacing and iron it to the back of your finished appliquéd book cover.

4. With the fabric nice and sturdy, this is where I added in the smaller details that sewing just couldn’t do :B I used the hot pink to paint some tiny sprinkles on the pop tart, the white paint to create little reflections on his eyes, and lastly the silver to make a sea of stars in the background. Of course, let the paint dry thoroughly before going to the next step.

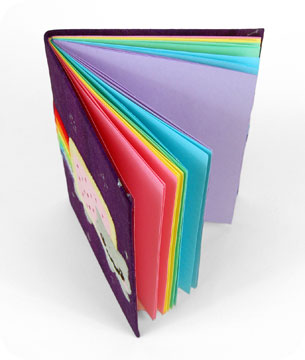
5. Aaand here’s some of that paper I was complaining about :B Take all of your sheets and cut them in half widthwise. All of your sheets should now be 8½” x 5½”.
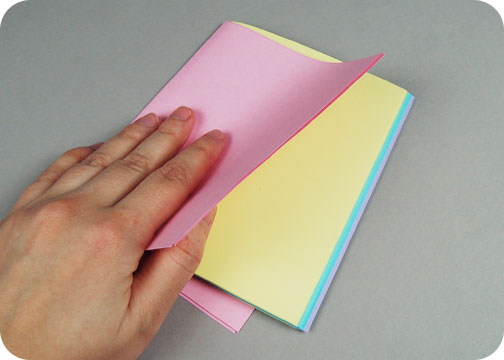
6. Now take all of your smaller sheets and fold those in half again. If you have a bone folder that works out nicely. To create the rainbow effect, layer all your pink sheets into one stack, then do the same with your yellow sheets. Slip your yellow sheets into the middle of the pink sheets. Repeat this with the green, blue, and purple sheets to create the full strata of colors. You should have a full stack of rainbow colors when you finish 😀
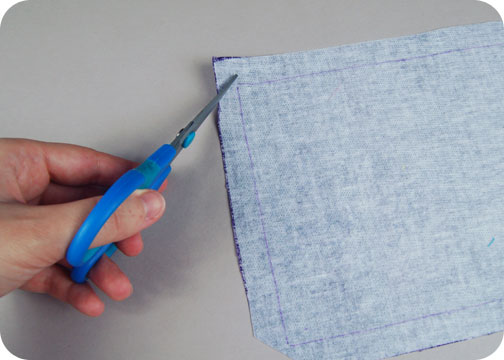
7. Now back to the book cover. We’re about to cover the poster board with the fabric, and the lines I drew from the pattern guidelines indicate where the poster board will go. To make the corners very clean, you’ll want to clip the fabric to get rid of excess bulk. Make sure to clip the fabric within ⅛” of the lines so you don’t clip too far by accident.

8. Now you can add your poster board. I personally really like rubber cement for this job. It’s a lot cleaner than other adhesives, and it’s strong while still being a temporary hold. If you go for it, apply a thin coat to both the back side of your cover and one side of the poster board. When the surface looks slightly dry, press them together. You could also use regular craft glue here, though I would be sure to brush it on with a foam brush to get a nice even coating of glue.
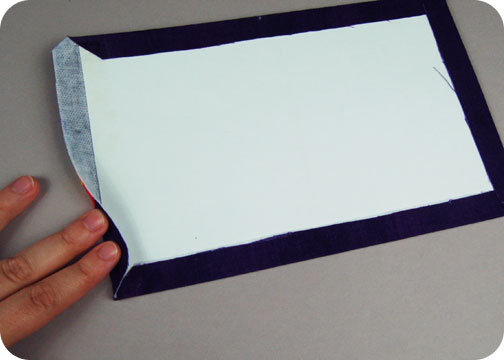
9. Now we’ll use the rubber cement again for each of the edges. Once those are ready to adhere, fold the edges over to affix them in place. It helps here to use a mallet or another similar heavy tool to get the corners and edges nice and flat and crisp. Once again you could use craft glue here if you prefer.
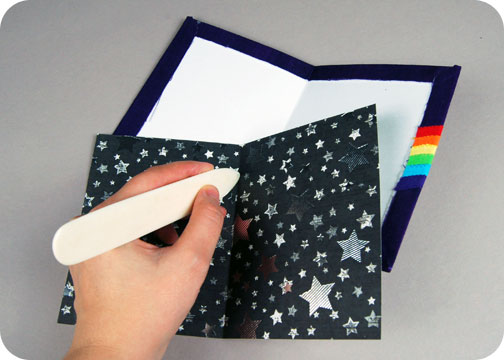
10. To get the cover looking more like a real book, you’ll need to fold it in half with wrong sides facing. This is much easier if you score the paper with a bone folder as you see me with here, but another pointed blunt tool also works like a pen without ink or a chopstick. Score the paper down the middle along the fold line indicated by the pattern guideline, and it creases the paper nicely for you. Do the same thing with your lining paper from the nice side of the paper so it folds with right sides together.
11. With both pieces nicely scored, you can glue them together. Here’s where you’ll want to use real craft glue, as rubber cement isn’t strong enough for the bond we need here. Center the paper lining on the inside of the book with wrong sides facing and glue it in place with the craft glue. Wait until it dries completely until you move onto the next step.
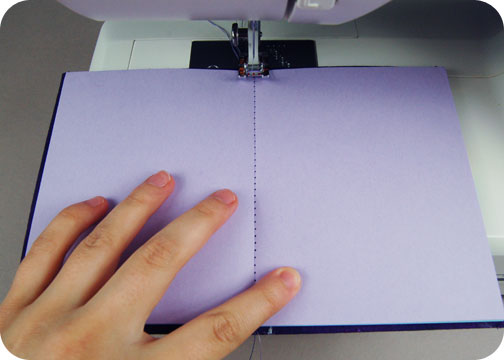
12. Now here’s the part where it’s really becoming a book! Take your folded rainbow papers and center them along the middle crease you just made, so everything all lines up. It should look like you’ve got a real book going! Except for the fact that the papers aren’t held in place. To do that, we’re going to do a quick seam down the middle, right into that fold. Be sure to use a rather long stitch length (8-9 stitches per inch should be good), as short stitches will perforate the paper.
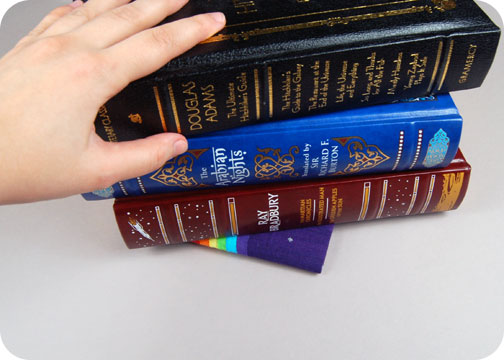
13. Your book is technically done! So congratulate yourself 😀 But you might notice that it doesn’t want to lie that flat. That’s an easy fix ^-^ Just gather up some of your heaviest books (or weights if you’ve got them), and stack them on your notebook. Leave it like that as long as you can manage (I usually do overnight), and in a bit your book should be looking nice and smooth and flat!
So what do you think? It felt so great to get back into book making – maybe I’ll work on some more and get rid of my stash of paper as well!
If you do try making the project, I’d love to see it! And I’ll send you exclusive free patterns as a reward!
For questions and terms of use information, please see the FAQ.