

Thanks to technology, enlarging & reducing patterns from a digital .pdf document is pretty simple. But if you’re worried about getting the details just right the first time, here are some tips for how to handle it so you can jump right in!
 What’s your percentage?
Determine what percentage you want to increase or decrease the project by looking at the finished size. This should be listed on your pattern. Focus on one measurement (such as length or height) and decide how much bigger or smaller your want that measurement to be. Divide the desired size by the original size.
Dolphin: 5” long vs. dolphin: 8” long = 160% increase
Next up is to dial in that new percentage you calculated:
 Open up the print dialog box.
 Type in the pattern pages you want printed.
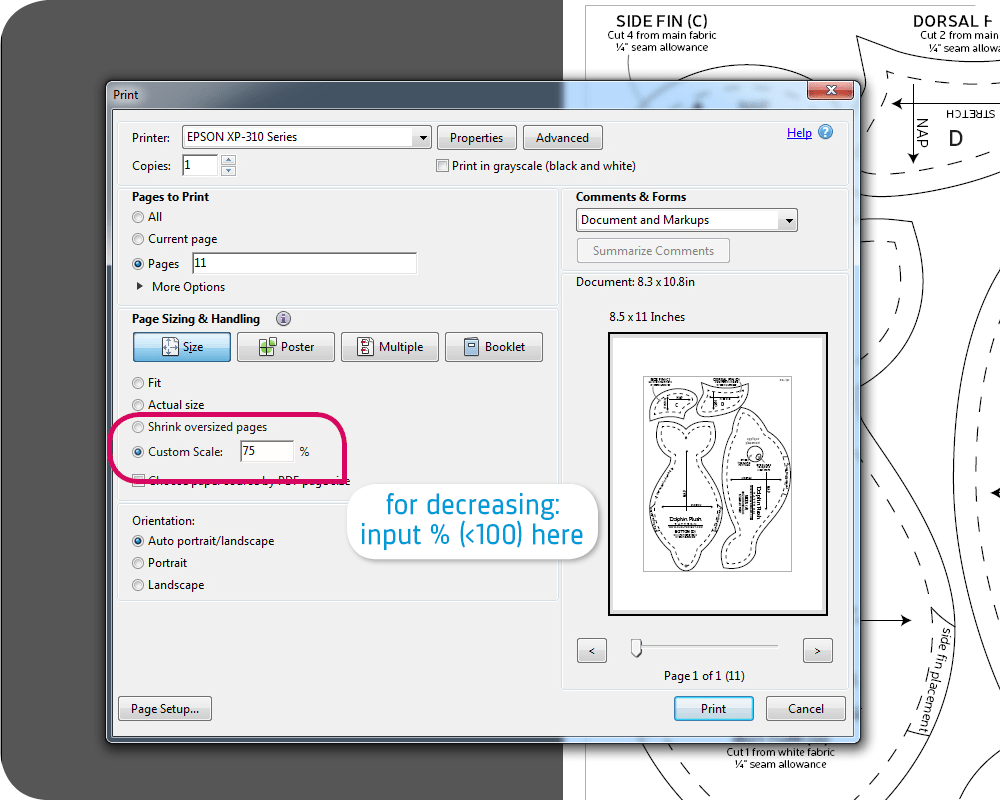 For decreasing: set “Custom scale” to your percentage (should be less than 100%). The page will print a smaller image on the same sheet.
 For increasing: click on the “Poster” button.
 Set the “Tile scale” to your percentage. This will split one page up into 2 or more pages each.
 The “Overlap” setting is how much the split pages will print the page adjacent to it. The finished pages will overlap once assembled. I think this makes assembly easier, and I go with .5”.
 Hit “Print” and print out all the pages for your newly enlarged or reduced pattern.
 If you have an enlarged pattern, your pattern pieces will need to be taped back together. Assemble the pattern pages by lining up the matching edges. Use the original document as a guide.
If your pattern included seam allowances, they’ll be inaccurate now because of all the scaling. Here’s how to add them back in:
 You can use the pencil method: This is done by rubber banding a pencil with another pointy object (such as another pencil, a chopstick, or a pencil with a spacer). The goal is to have the points spaced out enough to equal your seam allowance. Measure the distance, then adjust the pencil as necessary to make it work.
Once you’re ready, run one side of your new seam allowance pencil along the seam line of your pattern. The other end will then draw parallel to it. Drawing two lines at once automatically gets you a new seam allowance! If you do this with a reduced pattern, you might want to trace it onto a new sheet of paper to avoid overlapping the other pattern pieces.
 You can also try the ruler method: Find an accurate ruler (preferably a small one), such as a seam gauge, quilting ruler, or even a scrap of cardboard with your seam allowance marked on it. Align the mark equal to your seam allowance on the seam line, and make a dot with a pencil. Move the guide along and draw marks around your pattern piece, then connect the dots to complete your new cutting line.
Now you have your new pattern pieces, and you can cut and sew them up as usual!
20 thoughts on “Tutorial: Enlarging and Reducing .pdf Plush Patterns”
This helped a lot thank you!
Your pdf pattern scaling tutorial has saved my bacon multiple times. Thanks for this great guide!
Omg you are so awesome… I started sewing 2 years from now, but what I really fell in love with was sewing plushies.
Its so hard to find things about it, and here in brazil people don’t like so much to share, so I had a hard time evolving.
When I found your website I went crazy!! For me is like paradise!!! ^^
Thank you SO MUCH for sharing what you know! I’m a big fan. You really made a difference for the crazy plushie lady here! Heheh
♡♡♡♡
Wow, thank you so much! I’m so glad I could help! ♥
I really hope your future plush-making goes wonderfully 😀
This is gold!! Thank you for this genius tutorial!!
Thank You for new tutorial😊
Wysłane z iPhone’a
Dnia 25.10.2016 o godz. 17:29 Choly Knight napisał(a):
> >
Great!!! 😆
Ich hätte so gern das sm
Sadly I have Windows10 and it isn’t as easy to change the printing size and settings 🙁
Aw, that’s a shame 🙁 The steps shown here are for Adobe .pdf Reader — I had assumed the program would work the same across all operating systems.
Thank you so very much for your directions. They are all so easy to understand and follow.
I was wanting to know if the same principle would work on clothing?
It does! Resizing clothes can be trickier since people grow in different areas, but for a uniform enlargement throughout you could use this method.
Thank you, I just discovered your wonderful blog.
hi thanks you so much for all you do, i had a question my printer does not seem to have a poster setting & i have searched for an equivalent but either i don’t understand the posts or i just can’t find it.
the paper sizes are as listed
16k(184x260mm), 16k(195x270mm), 16k(197x273mm), 3×5, a4, a5,a6,bb(jis), b6, dl long edge, envelope#10, envelope b5, envelopec5, envelope dl, envelope monarch, executive, folio, japan envelope you #4, japanese envelope chou #3, japanese postcard, letter.
thank you again!
You may need to try a different .pdf reader to get the poster setting 😊 The one here is Adobe Reader: https://get.adobe.com/reader/
The poster setting will allow you to print the same image on multiple pages.
ohh globbb it’s freee, thank you so much ❤️
I’m so glad to have found this! My best friend wanted a giant version of the wolf plush and I wasn’t sure if I could make the pattern bigger until I saw this! Thank you so much!
This is so helpful – by chance, do you have a guide to also shrink/enlarge the embroidery files that go with these patterns, too? (And if you ever made a tutorial on how to make embroidery files for plush I would die of joy!)
Thanks so much! Unfortunately I don’t have a guide for resizing embroidery designs. In general it doesn’t work so well because it resizes the stitches too. So the finished stitching either ends up too dense or too sparse. I’ll keep looking into possible solutions though!