

This project came about because I realized I could probably use a new wallet. I’m not exactly sure what kind will work out best for me, so I’m trying out some different shapes. This particular one has a lot of the basic features: loads of pockets for cards, a slot for bills, and a pocket in the back for coins. I’ll have to see how it handles carrying my things. But if it doesn’t work out for me, maybe it will for you! I love that it gave me a chance to show off some of my large print fabrics because the whole wallet is basically one big sheet. The lining is made from polyester lining to deplete my stash, though it was a bit of hassle to work with so I’d probably recommend sticking with a thin cotton if you’ve got it.

Difficulty:
![]()
Pretty straightforward, but some parts call for some detail work that’s finicky.
Makes one wallet that folds up to 7 1/2” x 4”
Materials & Tools:
• 1/2 yd. of directional or 1/4 yd. of non-directional light to medium-weight fabric for outer wallet
• 1/8 yd. of complementing fabric for contrast band
• 1/4 yd. of lightweight fabric for lining (I used polyester lining fabric, but cotton will behave better)
• 1/2” wide sew-in snap
• 1/4 yd. of 45” wide light to medium-weight fusible interfacing
• Matching sewing thread
• Basic sewing tools (sewing machine, scissors, iron, needles, pins, fabric marker, seam ripper)
Before you begin:
1. Print out the project pattern here
2. Assemble the pattern pieces, see the page here for more help

1. This project is kind of interfacing-centered. That is it relies a lot on the interfacing to give it structure and body, so it’s really much easier to use the interfacing as your guideline when sewing. I would recommend you cut your interfacing first (following the paper pattern with seam allowances cut off – cutting out the back pocket window helps too), fuse it to the back of your fabric, then trim away the fabric leaving a 1/2” seam allowance as shown. The contrast band and back pocket need no interfacing, so you can cut those from your fabric as usual. Draw on any markings from the paper pattern as well.

2. First up is the back coin pocket. This is done by sewing a little zipper window. Line up the rectangular marking from both the lining piece and the wallet piece with right sides together. If you cut a hole in your interfacing here, they should line up with that too. Sew around that rectangle.

3. To open up that window so you can install the zipper, cut down the middle of it so it’s split open, then cut diagonally into the corners as close as you can to the stitching without actually cutting the threads.

4. Turn the fabric by pushing the lining in through the opening and flattening it on the other side. You should have a nice finished opening when you get the edges all pressed. The fabric might want to fight you, so it helps to press it for a long while.

5. Install the zipper by lining it up behind the little window with the zipper slider positioned inside. You can pin it in place here, but taping or using a dab of glue stick also works well and is less obtrusive. Sew around the edge of the window to anchor the zipper in place.

6. When the zipper is all installed, add the remaining pocket piece to the back of the wallet. Line up the raw edges and sew them together with a 1/4” seam allowance.
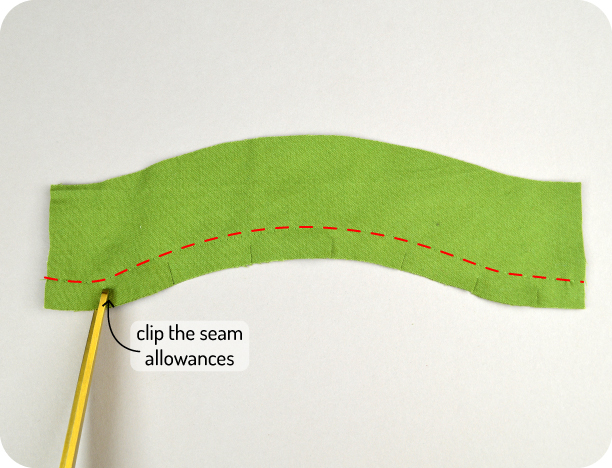
7. Next up, apply the contrast band to the top edge of the wallet. First create the contrast pieces by sewing the two with right sides together along the inner curve. When finished, clip the seam allowances so turning the piece is easier. Press the contrast section nice and crisp when complete.

8. Line up the sewn contrast band with the marking on your wallet piece and edge stitch it in place, close to the seam from step 7.

9. The inside of the wallet is started the same as the outside. Apply the interfacing to your uncut fabric, then trim away the excess until you have about 1/2” along the edges. To create all the pockets for the wallet, the lining is folded back and forth like an accordion. Mark the mountain fold lines on the right side of the fabric and mark the valley fold lines on the back side.

10. What we’re going to do with those marks is fold the fabric there and sew an edge stitch along the fold. This will hold the fold in place and make all the accordion folding for the pockets a breeze. For every mountain fold, fold the fabric with wrong sides together and edge stitch along the fold. For every valley fold, fold the fabric with right sides together and edge stitch the fold.

11. Allow the mountain and valley folds to do their thing and your lining should fold up like this. You have two sets of card pockets in the middle and one bill slot at the bottom.

12. Finish the card pockets by sewing lines where the pattern indicates for the card pocket separations. Sew through all the layers of the inner wallet and the simple folds now become 6 card pockets 😀

13. We’re nearly there! You can finally bring together the outer wallet and inner wallet. Layer the two pieces with right sides facing and match up the edges of the interfacing. Sew around the edge of the interfacing on the wallet, leaving an opening at the bottom as the pattern indicates for turning. You’ll see that now you can trim off the excess inner wallet fabric so when turned it will be the rounded shape of the outer wallet.

14. Turn the wallet right side out and gently poke out the corners and curves. Tuck under the seam allowances in the opening and iron the whole thing nice and flat. To close up the opening, run an edge stitch around the entire perimeter of the wallet.

15. To add the closing snap, attach the prong half to the inside of the wallet where the pattern indicates. Make sure it’s nice and centered, regardless of where the guideline ends up on how your wallet turned out.

16. To place the socket half of the snap, use the pattern guideline as a starting point, but fold up the wallet too (while it’s a little full, preferably) to see if things line up. You could mark a bit of fabric marker on the metal of the socket and press it into the other side of the wallet to see exactly where it lands. When you have it all set how you like, sew the socket half in place.
And it’s all done! I hope yours is able to keep your cards, bills, and receipts organized!
If you do try making the project, I’d love to see it! Send me a photo and I’ll send you exclusive free patterns as a reward!
For questions and terms of use information, please see the FAQ.
2 thoughts on “Freebie Friday! Tri-fold Wallet”
Made this wallet last week and it is really lovely! I’m now doing a second one that will be even better. One comment: you didn’t specify that a zipper is needed in the supplies list.
I’m so glad you like the pattern!
And thanks so much for catching that little snafu with the materials list 🙂 I’ll be sure to fix it asap!