

The patchwork is back again! Just as I warned :B As for this particular project, well, I’ve been in denial about it, but I finally admitted that I need a casserole carrier. The problem was I have a few options to carry food and pans to friends’ homes, an insulated grocery bag, a few totes, etc., but none of them actually worked! I have kind of a ragtag collection of pans, some larger than 9” x 13”, some narrower, some longer; you get the idea. It’s kind of nice when I’m discerning about just how much food I want to make, but not so good if I hope to make it fit into one of the bags I have. That’s why I finally caved and said I would make a casserole carrier. I could have made a fancy one that zips up and has piping and pockets and all that stuff, but considering the strange collection of different-sized pans I have, I thought I’d take this opportunity to try something furoshiki-style.
Furoshiki is the Japanese custom of using large scarves to wrap and carry your goods, tying knots to hold things in place and make handles. It’s incredibly ingenious and economical since a scarf can be tied to carry objects of about every shape and size. This particular carrier isn’t exactly the same, but the spirit is there, definitely. This square of insulated patchwork folds up over your casserole (no matter what size!) and the wide handles make it easy to grab or wrap over your arm. An extra layer of insulated batting makes the whole thing feel like a quilt and keeps your foods warm inside. It’s not as fancy or secure as an actual casserole bag, but I like it for its versatility.

Difficulty:
![]()
I’d probably give this 1 or 2 stars if you skipped the patchwork and just used whole cloth. So, all in all, pretty simple.
Makes one 32 1/2” x 32 1/2” patchwork square suitable for casserole wrapping
Materials & Tools:
• Various patchwork fabrics, totaling 1 1/3 yds. (I used a fat eighths bundle)
Note: You could also do this whole cloth and get 1 yd. of fabric for the outer carrier
• 1 1/4 yd. of lightweight fabric for carrier lining & handles
• 1 yd. of insulated batting
• Matching sewing thread
• Basic sewing tools (sewing machine, scissors, iron, needles, pins, fabric marker, seam ripper)
The Cutting:
0. If you’re using whole cloth, cut your handles following steps 3 & 4, then skip to step 7.
1. From your various patchwork fabrics, cut 6 strips, 7 1/2” x width of fabric
2. Subcut each strip into 5 squares, 7 1/2” x 7 1/2” (26 squares total)
3. From your lining fabric, cut 1 strip, 13” x width of fabric
4. Subcut this strip into 2 rectangles, 21” x 13”. These are your handles; reserve the rest of the lining for the carrier.
Your pieces so far should look something like this:

The Sewing:

5. The patchwork part of the carrier is just a series of random half-square triangles, just to keep things simple. If you’re a quilter, you probably know how we’re going to piece those. You’ll want to pair up each square with a complementing one (with right sides together), draw a line from one corner to the other, and sew 1/4” away from each side of the line, cut them in half down the drawn line, and you’ve created two sets of triangle blocks. Repeat this process until you have 25 blocks to create the outside of the carrier. You’ll end up with one extra since we’re working in pairs, so you can use this to swap out something in your assembly 😀

6. The outside of the carrier is made up of a grid of 5 blocks by 5 blocks. Sew 5 of the blocks together into a row (I like to press my seams open). To get the look I have, you’ll want to have all the triangles leaning in the same direction. Create 5 rows of 5 like this, then sew the rows together to create a large square that’s about 33 1/2” x 33 1/2”. Though absolute precision isn’t necessary for this project.

7. To create the carrier shape, you only need to trim off a little from your finished patchwork. Fold the patchwork in half diagonally so the whole thing makes a large triangle. From corner that forms a right angle, measure out 10” along each side, then draw a line bringing together those markings. Trim the patchwork along this line, going through both layers of patchwork. Use this finished shape as a pattern to cut both your lining and your insulated batting. Simply lay it out on your fabric and batting, pin, and cut around the edges as you usually would.

8. Next up is to add the handles. To make them, simply fold each handle piece in half lengthwise and sew down the long edge. Turn it right side out and press when complete. You should have 2 handles when complete.

9. The handles are attached to the trimmed edge we just created in step 3. Line up the raw edges of the handle with the trimmed edge so they butt against each other in the middle. You’ll know you have it right when there’s about 3/4” on each side. Baste the two ends of the handle in place here, then repeat the same for the other trimmed edge of the carrier and the remaining handle.

10. Now we can finally bring together the outer carrier and lining. To do this, layer your lining, batting, and patchwork in this order: insulated batting (shiny side up), lining (right side up), patchwork (right side down). Line up all the raw edges and pin the layers in place.

11. With the layers all pinned in place, you can now sew them. Be sure to leave at least a 5” opening on one straight side for turning the carrier right side out next. It helps to mark it beforehand. Once finished, reduce the bulk by trimming away the excess batting in the seam allowances. To make the next step easier though, don’t trim away all the batting in the area where you left an opening.

12. Trim the excess fabric in the corners of your carrier and turn it right side out. Poke the corners with a chopstick (or similar tool) so they come out nice and sharp, then turn under the seam allowances in the opening from the previous step. Press everything nice and flat, then sew a top stitch around the perimeter of the carrier to close up the opening and give the carrier a nice finish. At this point, you could call your carrier done, but some additional quilting definitely wouldn’t hurt, and would add to the warmth and sturdiness of your carrier.
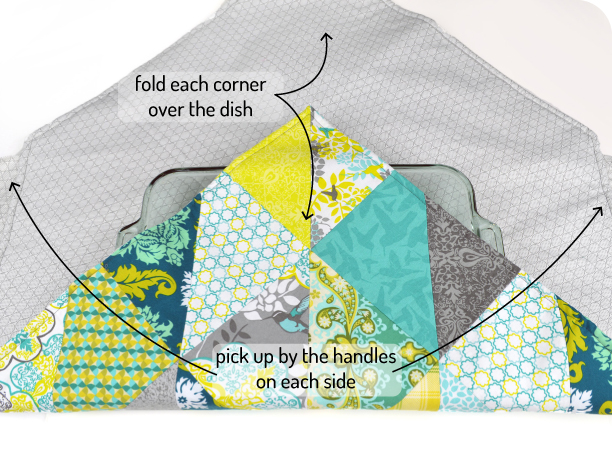
To actually use the carrier, all you need to do is place your casserole dish in the middle of the carrier and fold up the pointed ends around the sides. Then pick it up from the handles on the opposing sides!
There you have it! I can’t wait to see how transporting hot foods is going to be so much easier now. No more carefully wrapping things in towels then trying to fit them into bags!
If you do try making the project, I’d love to see it! Send me a photo and I’ll send you exclusive free patterns as a reward!
For questions and terms of use information, please see the FAQ.
2 thoughts on “Freebie Friday! Furoshiki Casserole Carrier”
Would love to find this pattern. Would make carrying dishes so much easier as well as the fact that it so stylish!
I think the link to the pleated ombre pouch may be broken? I clicked that and ended up here.