

Whoa, it’s been a while since my last post! ;o; Don’t worry, everyone, I’m still alive! Just very busy! I promise to get back to posting more regularly once I get caught up – should be sometime in the next few months ^0^

It feels good to do another plush again! 😀 I liked the look of the Wampa Plush from a while back so much that I thought I would make another with a similar shape – Cthulhu seemed like a nice fit. I just love how I’ve made a big scary elder god into a pudgy little thing :B He comes complete with face tentacles and wings on the back as well.

Difficulty:
![]()
Some of the seams are a little tricky to handle, but all in all it’s very simple.
Makes one plush that’s 8” from head to feet and 11” from arm to arm
Materials & Tools:
• 1/4 yd. of plush fabric (I prefer fleece, but a thick knit fabric like interlock or minky would also work)
• Batting
• Matching sewing thread
• Basic sewing tools (sewing machine, scissors, iron, needles, pins, fabric marker, seam ripper)
Appliqué supplies
• 3” x 3” scrap of black appliqué fabric
• 3” x 3” scrap of red appliqué fabric
• 4” x 4” scrap of light or heavy duty fusible web
Before you begin:
1. Print out the project pattern here
2. Lay out the pattern pieces on your fabric and cut them out
3. Mark the fabric pieces with the markings from the pattern

1. First up is just a bit of appliqué for his eyes. I can see painting these on with fabric paint if you prefer an alternative, but otherwise you’ll want to trace the appliqué pattern to some fusible web, iron the fusible web to your fabric, cut out the pieces, then iron the pieces to your fabric following the pattern guidelines. I sewed my pieces in place with a zigzag stitch, but you could also do a straight stitch or satin stitch if you like. Or you can skip the sewing altogether and use heavy duty fusible web to iron the fabric bits on.

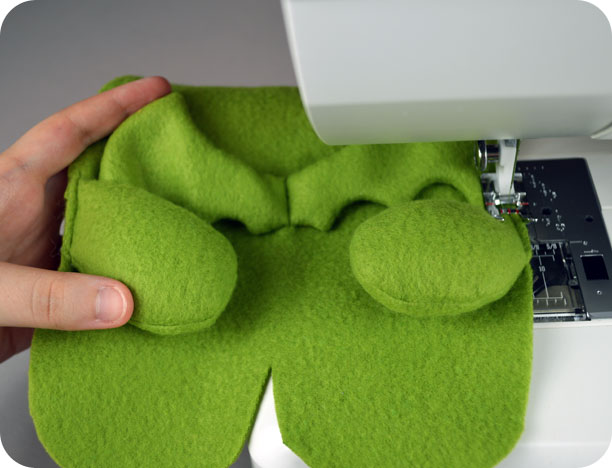
2. Line up the head and leg pieces together with right sides facing and sew them along the curved tentacle portion. When complete, trim the seam allowances, turn the tentacles right side out and press them lightly.

3. For the wings, layer the two wing pieces together with right sides facing. Sew around the perimeter, but be sure to leave an opening in the top where the pattern indicates for turning the wings right side out later. Trim the seam allowances, turn the wings right side out, and press it flat.

4. Tuck under the seam allowances in the wings and sew the opening closed with a ladder stitch.

5. With the wings complete, you can now add them to the back of your Cthulhu 😀 Simply line them up on the back of Cthulhu where the pattern guideline indicates and sew it in place down the center.

6. To complete the arms, simply layer two of the arm pieces together with right sides facing. Sew around the curved edge, leaving the straight edge free for turning the arm right side out. Turn the piece right side out, then stuff it lightly with batting. Repeat this for the other arm as well ^w^
7. Line up the raw edges of the arms against the sides of Cthulhu’s back where the pattern guidelines indicate. Baste the arms in place in preparation for the next step.

8. Layer Cthulhu’s front and back together with right sides facing, be sure all his wings and arms are neatly tucked inside his body, then sew around the perimeter of his body. Be sure to leave an opening where the pattern indicates for turning him right side out. Trim the seam allowances (especially between his legs), turn the plush right side out, then stuff him firmly.

9. Once Cthulhu’s all nicely stuffed, tuck under the seam allowances in the opening, and sew the opening closed with a ladder stitch.
I hope you all like him! I think my favorite part is that you can flip his face tentacles up and down :B he goes from a scary elder god “RAWR!” to a muffled “bfffbbllmmnfff!”
If you do try making the project, I’d love to see it! And I’ll send you exclusive free patterns as a reward!
For questions and terms of use information, please see the FAQ.
15 thoughts on “Freebie Friday! The Cthulhu Plush”
Thanks to your great pattern a new Cthulhu was born today and will be given away as a birthday present on sunday. I changed it slightly, enlarged the pattern 140% with a copier and used black buttons as eyes. I also stuffed the wings an tentacles because it looked better on the bigger plush.
My blog is in German but there are photographs as well: http://raumstationvokuhila.blogspot.de/2014/06/ein-cthulhu-zum-liebhaben-ia-ia.html
Oh wow! He looks amazing! I hope the giftee loves it because I think the big version looks great 😀 Thanks so much for sharing!
Thanks so much for the pattern!! I made two of them; one for my daughter and one for a gift. The eyes came out a little wonky but I plan to make many more as all my friends have complimented them. I might try Ravna’s suggestion of making it larger, too! Pictures are on my blog: http://thereshesews.blogspot.com/2014/08/demonic-sewing.html
Oh my gosh that is great! I’m so glad it worked out well for you and all your friends love it 😀 Thanks so much for sharing the link! ♥
Love it! Just what I was looking for! Thank you so much for making this!
Hello! Dunno if this website is still accurate and if you’ll see that one day, but I just have sewn this for a friend’s birthday.
All in hand sewing, I don’t have a sewing machine, but still, for my first plushie, I’m quite glad 😉
Can send you a picture if you want to!
Lots of thanks for your patterns <3
Karha
That’s wonderful to hear! I’m so glad you enjoyed the pattern 😀 If you’d like to share the photo that would be great ♥ Many people post them on my Facebook page: http://www.facebook.com/sewdesune
I made this for my soon-to-be grandson. Pattern was to follow and turned out great! I used sparkly red ribbon for the eyes, and sewed them on with a satin stitch zigzag in black thread so I didn’t need the black appliqué fabric. Thank you for sharing your wonderful creative work! How can I share a picture of my Cthulhu?
I’m so glad it went well for you! The red ribbon idea sounds wonderful 😀 If you’re on Facebook that’s an easy way to share the image with other fans: facebook.com/sewdesune
Here’s how mine turned out. I used sparkly ribbon for the eyes, and appliqued them on with zigzag stitched instead of cutting out a border piece. Thanks for the cool pattern!
https://www.deviantart.com/shrlzi/art/RenderedImage-880500465?ga_submit_new=10%3A1621872895
That looks fantastic! Thanks so much for sharing the photo! ♥
He turned out so adorable, in spite of the fact that I have limited sewing experience and no sewing machine. I highly recommend sewing some overalls for him as well. (Pic: https://www.reddit.com/user/01Brain/comments/rlb7mc/ftagn_plush_pattern_by_cholyknight_pants_by_me/?ref=share&ref_source=link )
Oh wow, that looks amazing! Thank you so much for sharing 🤩
Made one of these for a friend and she absolutely loved it:) I am a total beginner and your patterns have given me a lovely new hobby. Thank you!:)
https://i.imgur.com/fmTHGPW.jpg
Oh cool! That looks fantastic! I’m really glad you’re enjoying the patterns 🥰 Thanks for sharing the awesome photo!