
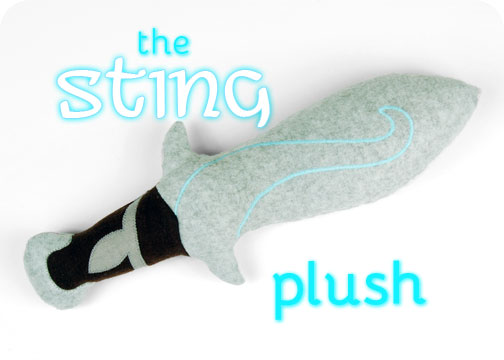

Happy Hobbit Day everyone! Today marks the birthday of both Bilbo and Frodo Baggins ^w^! With the newest The Hobbit movie installment coming out soon and my undying love for second breakfast, it seemed silly not to celebrate 😀 As you might know, I held a giveaway where I gave out this little cutie about a month ago, since I knew for a while that I wanted to do something special for Hobbit Day 😀 So I’m very glad I finally get a chance to share the tutorial with you! The sword shape is very simple to do with just a bit of appliqué and some stuffing, but the real kicker is the bit of satin stitching I did in glow-in-the-dark thread to simulate Sting’s ability to glow blue when orcs are near >w< Hopefully you’ll give the pattern a try whether you have special thread or not – it’s just perfect for pillow fights!

Difficulty:
![]()
Really easy to put together if you don’t mind a bit of appliqué and hand-sewing 😀
Makes one plush that is about 14” long
Materials & Tools:
• 1/3 yd. or a 12” x 12” scrap of gray fleece
• 1/4 yd. or an 8” x 8” scrap of brown fleece
• Batting
• 10” thin wooden dowel (optional)
• Matching sewing thread
• Blue glow-in-the-dark thread (mine was from Sulky)
• 8” x 8” scrap of tear-away stabilizer (optional – see step 1)
• Basic sewing tools (sewing machine, scissors, iron, needles, pins, fabric marker, seam ripper)
Appliqué supplies
• 8” x 8” scrap of gray appliqué fabric (cotton, felt, or flannel would work fine)
• 8” x 8” scrap of light or heavyweight fusible web
Before you begin:
1. Print out the project pattern here
2. Assemble the pattern pieces, see the page here for more help
3. Lay out the pattern pieces on your fabric and cut them out
4. Mark the fabric pieces with the markings from the pattern
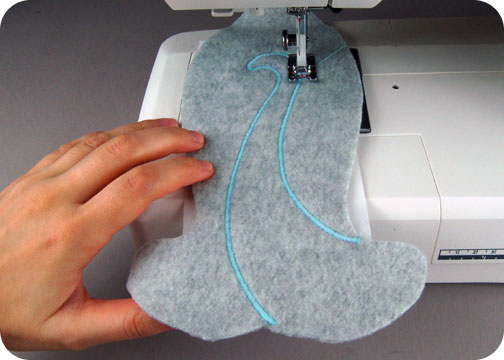
1. The first thing you’ll want to take care of is the filigree embellishment on the blade of the sword itself. I used a blue glow-in-the-dark thread to satin stitch along the pattern guideline that formed the filigree. You could also use glow in the dark paint to paint the line, or sew a simple straight stitch or zigzag stitch along the line. But if you do a satin stitch like me, you’ll want to use a piece of tear-away stabilizer beneath your stitching so the dense satin stitches don’t warp your fabric. Repeat this with your other blade piece so the whole plush will be double-sided 😀
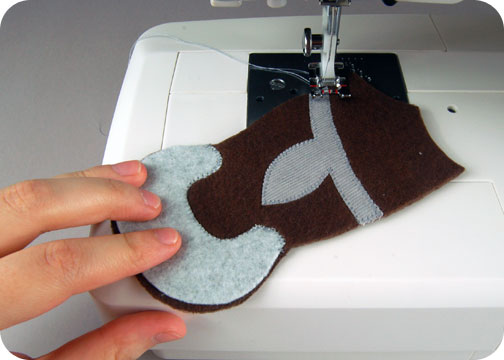
2. After that is the bit of appliqué you’ll need to do on the grip. There’s no need to get fancy with this part. Simply use your fusible web to apply the pieces to your grip following the pattern guidelines, and, if you used lightweight fusible web, you’ll want to sew it down with a straight stitch or (as I’ve done) a zigzag stitch. If you used heavyweight fusible web, all you need to do is iron the pieces on 😀 the adhesive in the heavyweight stuff is meant to be strong enough that you don’t have to sew it down. However you apply the appliqué, repeat this with the other side of the grip.

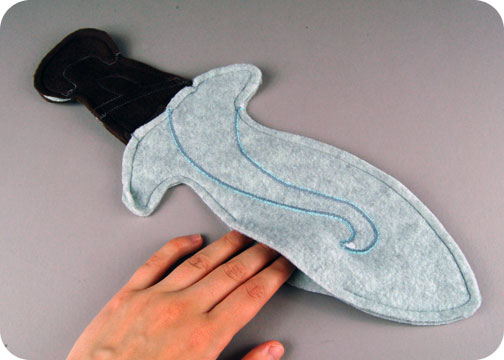
3. Now you’ll want to sew your sword grip to the blade. You should see how the sword grip has a point that matches up with the notch at the bottom of the sword blade. You’ll have stretch the fabric in the grip to make them line up along that edge, but when you do so you should be able to sew them together ^-^ Repeat this with the remaining sword blade and grip pieces, the press the seam allowance towards the grip.
4. Now you’re ready to put together the whole sword 😀 Simply layer the two sword halves with right sides facing together and sew around the perimeter of the sword, leaving an opening in the side of the blade as the pattern guidelines indicate. When you finish, trim your seam allowances and turn the whole sword right side out.
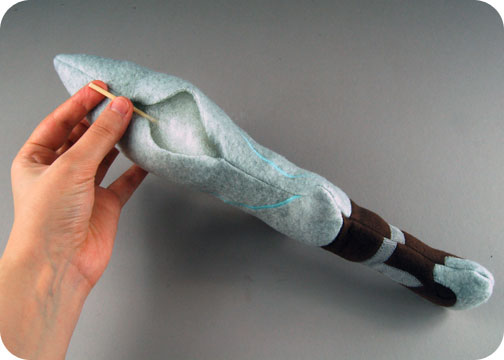
5. Now you’ll want to stuff Sting with your batting. You’ll want to stuff all the pointy bits like the tip of the sword, the pommel, and the cross guards nice and full so they stay looking pointy. But for the rest of Sting you just need to stuff enough so that it’s semi-full and doesn’t lose its sword-like shape.
Also, this is where you’ll want to add in your dowel. This is completely optional, as the sword stands up just fine to swinging and slashing without it, but I opted to add some extra support to Sting ^-^ I used a thin wooden dowel (a skewer specifically), trimmed off the sharp parts so the whole thing was blunt, then stuffed it in the middle of Sting, going down the length. Make sure it’s perfectly in the middle and your sword will have a bit more stability when you swing it around.
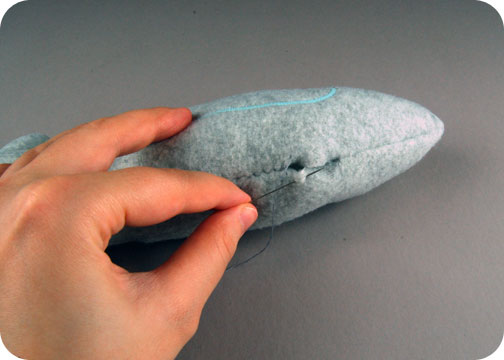
6. With the sword all filled and ready to go, all that’s left is to sew closed the opening in the side of the blade! Simply turn under the seam allowances left in the opening and sew it closed with a ladder stitch. Now go on some spider-stabbing adventures because YOU’RE DONE!
I hope you enjoy your Hobbit Day! If you like this and want to see more Tolkien-esque projects in the future, let me know in the comments! 😀
If you do try making the project, I’d love to see it! And I’ll send you exclusive free patterns as a reward!
For questions and terms of use information, please see the FAQ.
11 thoughts on “Happy Hobbit Day! Bonus Pattern: The Sting Plush”
oh my goodness this is so cool. You think if you can’t get glow in the dark thread if you can use glow in the dark fabric paint?? Do you think that would work???
>w<! Thank you! And yes, I definitely think glow in the dark paint would work 😀
This is soooo cute!!!! I think i’ll make one for my DnD sessions lol ^_^
^o^ I love that idea! I’m glad you like it! 😀
Oh my goodness this is awesome I have to make it!
This would be great for kids who are afraid of monsters!
Thank you for your free patterns! I listed this in my shop and it turned out to be my best-selling item! I love this sword. I put my own little design on it and I’ve gotten nothing but positive feedback so far. ❤
Oh, wow! That’s wonderful! I’m so glad the pattern was successful for you 😀 I certainly hope it continues ♥ You have an amazing shop!
i’m using a bunch of your patterns to make toys for ronald mc donald house thx for designs.
This is amazing!! I’m a Lord of the Rings fan as well as a fan of your patterns and projects and this was such a treat to find! This is a lovely and simple little Sting that looks great with my LotR collection
Aw, that’s fantastic! I’m so glad you like it! ♥