

I’m bringing back more retro technology! x3 I’ve already got the Floppy Disk Coasters and tablet case that looks like an old school Gameboy, now boom boxes get a chance to shine! Ahh, the hours I used to spend recording my favorite songs from the radio while sitting in front of my stereo 🙂 I admit the design looks pretty funky and goofy, but I still like it ^-^ In fact, I made it just for me really. I have a few old reliable messenger bags that I think might be ready to put out to pasture, so I wanted to make sure my newest big bag had all the organization I need to keep things in line.
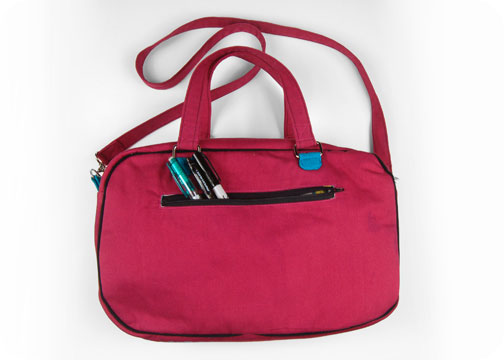
This bag sports a back zipper pocket, loads of inner pockets, and a detachable shoulder strap so I can switch between carrying in my hand or over my shoulder at will. Of course the front is covered with awesome colorful appliqué, and there’s also decorative piping to give it that extra punch 😀

Difficulty:
![]()
Most of the bag is pretty straightforward, but the little details like the piping, back pocket, and curved corners push it over the edge into intermediate territory.
Makes one bag that is 14” wide, 9” tall, and 3” deep.
Materials & Tools:
• 2/3 yd. of medium to heavyweight fabric for outer bag, strap, and handles (denim or canvas would be perfect – I used interfaced twill)
• 1/8 yd. or a 12” x 12” scrap of contrast medium to heavy weight fabric for strap and handle tabs (denim or canvas would be perfect – I used interfaced corduroy)
• 3/4 yd. of lightweight fabric for lining (I used quilting cotton)
• 18” zipper (at least)
• 10” zipper (at least)
• Four 1” metal rings
• Two 1” D-rings
• Two 1” hook rings
• 2 1/2 yds. of contrasting piping, or cording and fabric to make your own
• 2 3/4 yds. of bias seam binding tape, or fabric to make your own
• Matching sewing thread
• Basic sewing tools (sewing machine, scissors, iron, needles, pins, fabric marker, seam ripper)
Appliqué supplies:
• 8” x 8” scrap of dark gray appliqué fabric
• 10” x 5” scrap of light gray appliqué fabric
• 4” x 4” scrap of blue appliqué fabric
• 8” x 8” scrap of black appliqué fabric
• 4” x 4” scrap of white appliqué fabric
• 1/4 yd. of 22” wide lightweight or heavyweight fusible web
Before you begin:
1. Print out the project pattern here
2. Assemble the pattern pieces, see the page here for more help
3. Lay out the pattern pieces on your fabric and cut them out
4. Mark the fabric pieces with the markings from the pattern
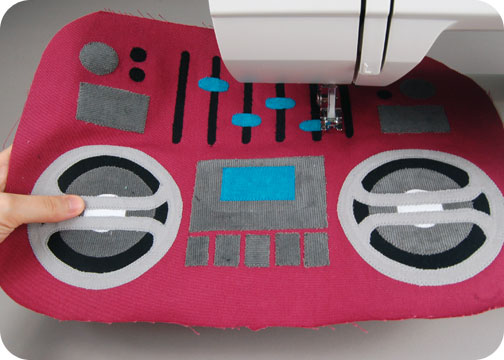
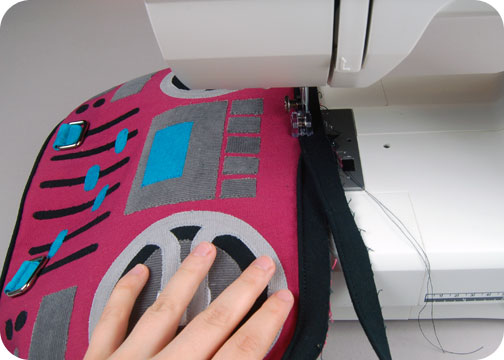
1. First is the appliqué, and it’s a real doozy XD I wanted to get a lot of all the little panels and knobs and such on my bag, so applied all the little fabric shapes you see here. You’ll want to cut them out of your appliqué fabric and adhere them to either light or heavy weight fusible web. Then you’ll need to arrange them according to the pattern guidelines (note that the layering of the speakers goes black, dark gray, white, light gray) and iron them in place. If you use heavyweight fusible web, the adhesive should be enough to hold all of your pieces on. I personally used lightweight fusible web which will require you to sew your pieces on – I did a zigzag stitch around all the shapes to get this look 😀
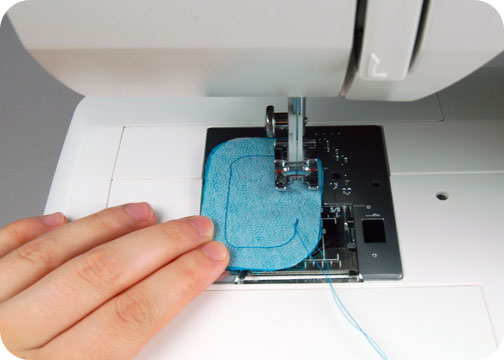
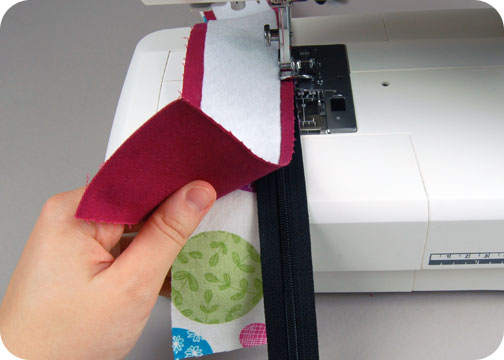
2. To make the little tabs for attaching your handles, start by layering two of your handle tabs together with right sides facing. You’ll see here I strengthened my contrast fabric a bit with some interfacing, since I was using some flimsy blue corduroy (cute, but it needed to be stronger for a bag). Sew around the perimeter of the tab, leaving an opening in the side as the pattern indicates for turning the tab right side out. Repeat this three more times with your remaining tab pieces so you have four total. When complete, trim the excess seam allowance and turn the tabs right side out.
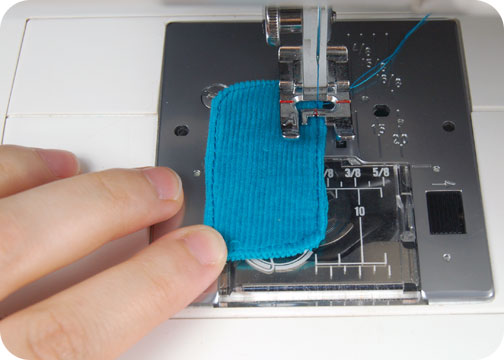
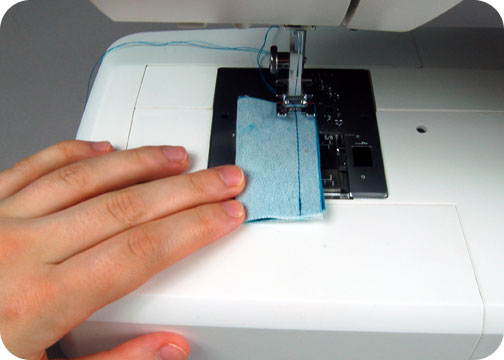
3. Press the tabs nice and flat, then edge stitch around the finished tab to both close up the opening in the tab and also make the edges look neat and pretty.
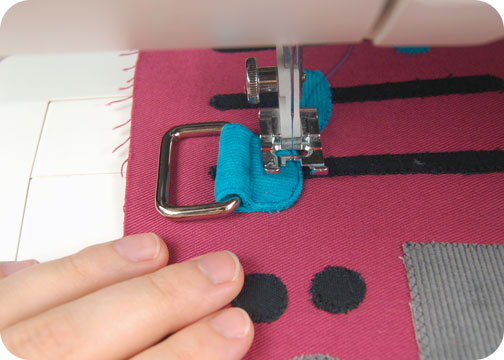
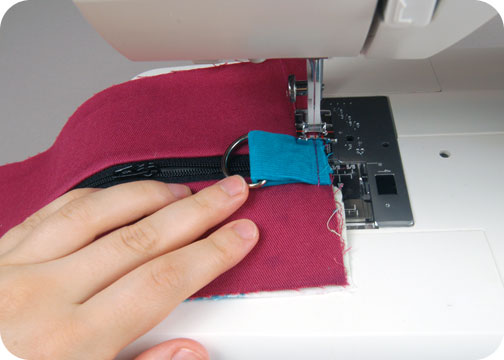
4. Now we can use those tabs to attach the metal rings for our handles. Fold the tabs in half while looping one of your metal rings through it, then lay it down on your bag front where all the appliqué is. Sew it down around the overlapped space where the pattern indicates (so it looks like one of the sliding knobs). Repeat this for the other tab on the front of the bag as well as the last two tabs for the back of the bag.
5. This bag has an extra zippered pocket on the back made from inserting a zipper into a little fabric window. You start by layering one of your back pocket pieces over your bag back with right sides together. Line them up according to the zipper opening guideline on the paper pattern, then sew around the rectangle guideline marked on the pattern.
6. After the rectangle’s sewn, go in and clip the inside of the rectangle open. The pattern guidelines will give you an idea – you’ll need to cut down the middle of the rectangle in a long slash, then cut outward towards the corners as close to your stitching as you can get without accidentally snipping your stitches.
7. Using that opening you’ve just cut, turn the fabric pieces right side out. It takes a little finagling and won’t feel quite right, but if you do it correctly you should end up with a little window where your rectangle was and your fabrics should have wrong sides facing together now. Give that window a good ironing so it stays flat.
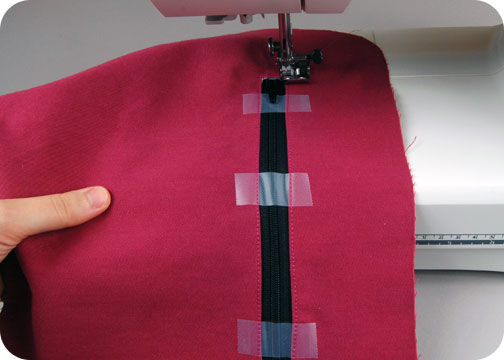
8. With the window complete, you can now add in your 10” zipper. Layer the zipper beneath your outer bag fabric so it’s centered within that little rectangular window. I like to hold my zipper in place with scotch tape, but you could also use fusible web, pins, or even a glue stick to hold it in place while you sew around the edge of the rectangle. Be sure your zipper slider is moved to the middle of the window while you sew.

9. To complete the pocket, simply take your other back pocket piece and layer it over the piece with the zipper, right sides facing. Sew completely around the perimeter of the squares and that finishes your pocket! No need for turning or clipping here 😀
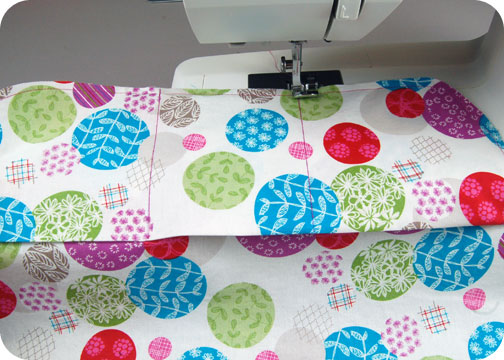
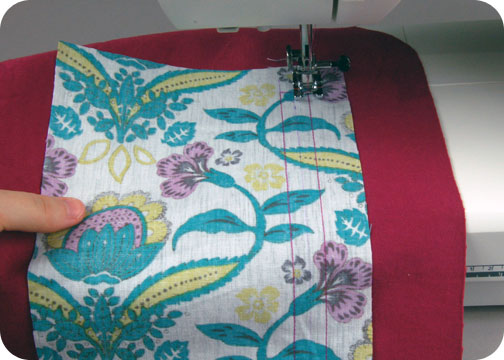
10. Now onto the lining. I personally wanted several inner pockets in my bag – the pattern calls for four lining pieces for the front and back when you typically only need two. Take those extra two and fold them in half lengthwise with wrong sides together. Line up the raw edge of one folded piece against the bottom edge of one of your unfolded lining pieces. We’re going to baste those layers together around the edge and a few lines down the middle to create the inner pockets. As you’ll see in the picture, I sewed two lines down the middle of my pocket section so I have three distinct pockets now – perfect for my phone, pens, etc. Repeat this same process with your last two lining pieces so that both the front and back of your inner bag has loads of pockets for organizing 😀
11. When your pockets are all complete, baste your lining pieces to your finished outer bag pieces. Make sure the right sides are both facing out and the top sides are aligned when you do so. We want the front and back bag pieces to act as one for the rest of the project.
12. Next you’ll want to baste the piping to your bag – this is where I made my own. I had some extra cording lying around that I was able to use up. With some 1 1/4” wide bias fabric and a piping foot, I wrapped the cord with the bias and sewed the cord in the middle, stitching as close as possible to the cord thanks to my piping foot.
13. Whether you’ve made your own piping or purchased yours, this is where you’ll need to baste it to your bag. Once again using my piping foot, I basted the piping to the edge of the front and back pieces of the bag so the cording lies just inside of the stitching line. That way when I add the sides of the bag later the cording will peek out perfectly. I overlapped the piping along the bottom middle side of the bag to be less noticeable. It is possible to go back and rejoin your cording so it looks continuous, but this is a nice alternative. Just repeat this with the back of your bag, and now the front and back of your bag are complete!
14. Now we can finally move onto the sides! For the top section of your bag, sandwich your 18” zipper between one of your outer fabric top pieces and lining pieces with right sides together and raw edges lining up with the zipper tape. Sew them together with a 1/4” seam allowance and press the fabric away from the zipper when you finish. Then repeat this with the other side of your zipper tape and the remaining bag top pieces.
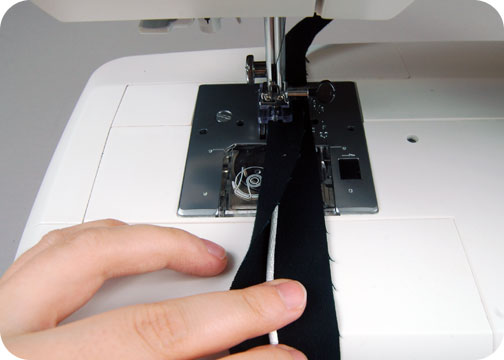
15. Next up the side tab for your shoulder strap. Simply fold the tab in half and sew one side together to make a little tube. Turn it right side out and press it flat with the seam in the middle instead of to one side. Repeat this with your other side tab pieces so you have two total.
16. Loop the tab through one of your D-rings and match up the raw edges. Trim your excess zipper tape from step 14, then line up the raw edges of your side tab over the zipper tape and baste the tab in place. Repeat this with your other tab piece on the other side of your bag top.

17. With your bag top all ready to go, you can now add your bag bottom. Simply sandwich the short end of your bag top between the bag bottom outer fabric and lining pieces (with outer fabric facing outer fabric and lining facing lining). Sew all these layers together, then press the fabric away from the zipper. I personally did a little edge stitch afterwards to keep all the layers in line after ironing. Then you’ll want to repeat this with the other side of your bag top and bottom. When you finish you should have a ring of fabric.
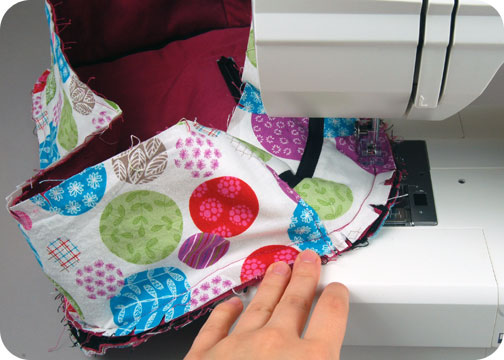
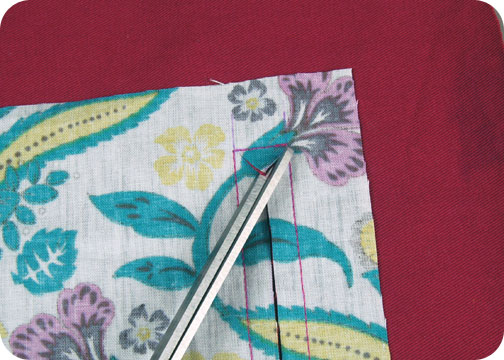
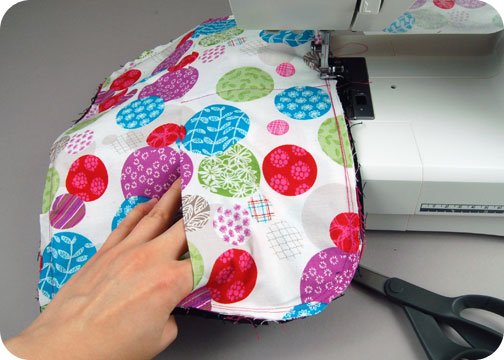
18. With your bag sides all done you can then start to attach it to your bag front and back. This is the part that’s a little tricky because you’ll need to use a piping foot again if you want your piping to show. Begin by pinning the layers in place, wrapping the long edge of the bag sides around the edge of the bag back. Clip the seam allowances of the bag sides so it curves nicely around the corners of the bag back. The seams that join the top to the bottom should match up with the square markings from the paper pattern, and the center fold of the bag bottom should match up with the single notch. When everything is lined up nicely, start sewing around the perimeter of the bag. When you finish, open up your zipper a bit so you can turn your bag right side out later, then repeat this whole step with the other edge of the bag sides and the bag front. This is probably the most difficult part of the bag, so congratulate yourself when you get it!
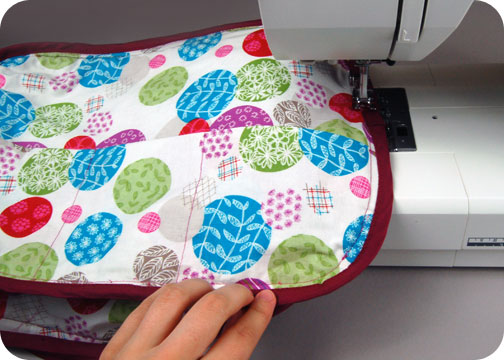
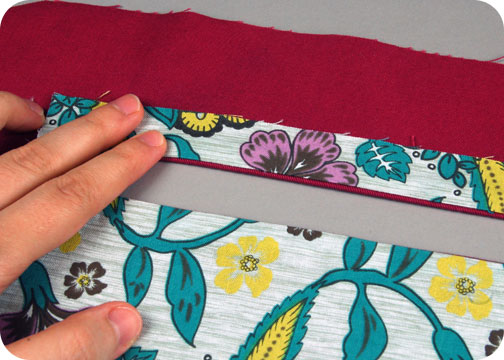
19. I personally wanted to cover up all of those raw edges inside my bag, so I used some extra bias tape I had to bind up those seams. You could use homemade bias tape as well.

20. To make the strap and handle, begin by folding under the short edge of each handle and strap piece by 1/2” and iron it flat. Fold the entire strap in half lengthwise with right sides together, then sew them along the long edge using a 1/4” seam allowance. Turn the straps right side out then iron them good and flat.

21. To keep them looking crisp, I personally edge stitched down each side of the strap (with some contrasting thread for fun).
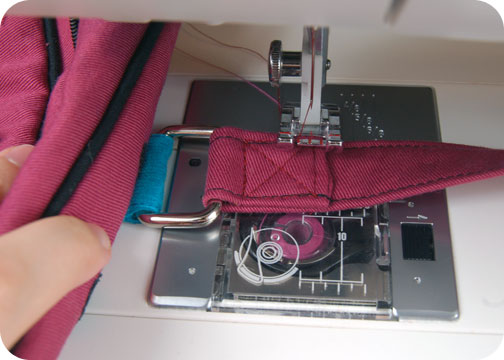
22. To complete the handles, simply fold one end of one of your handles through the metal ring back from step 4. Overlap the fabric by about 1 1/4”, then sew it in place with a box stitch. Repeat this with the other end of your handle and the remaining metal ring on that side of the bag (being sure not to twist the handle along the way). When that’s all complete, repeat this whole thing again with your remaining handle piece and the other side of the bag.
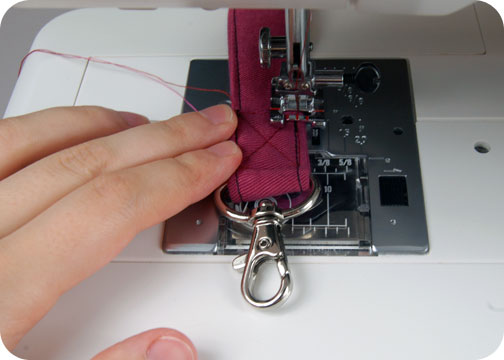
23. For the shoulder strap, it’s pretty similar. Fold over one end of the shoulder strap through one of the hook rings and overlap the fabric by about 1 1/4” and sew the layers in place with a box stitch. Repeat this with the other end of the shoulder strap and the remaining hook ring. Now you can attach your shoulder strap to the D-rings on the side of your bag whenever you wish! Now go load up your awesome new bag because YOU’RE DONE!
So what do you think? Even without all the boom box appliqué it’s still a pretty neat bag I think ^-^
If you do try making the project, I’d love to see it! And I’ll send you exclusive free patterns as a reward!
For questions and terms of use information, please see the FAQ.
1 thought on “Freebie Friday! The Boom Box Bag”
Thank you so much for posting this free pattern and tutorial. I made a bag using your pattern and I just love it!