
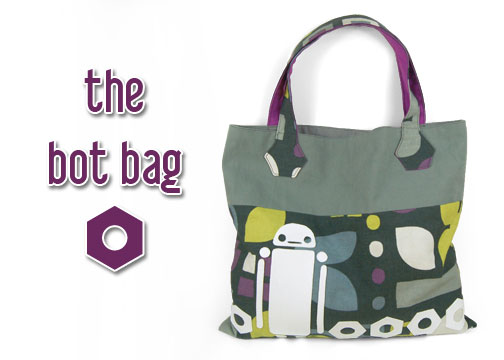
Today is bringing back a bit of nostalgia x3! By that I mean the fabrics from this bag are the ones I used for projects from when I first started up my blog, both the Frayed Tote Bag and the Zipper Bucket Bag. That’s about as nostalgic as one can get from a blog that isn’t even 6 months old yet :B
With these leftover fabrics, I thought they had almost a mod-looking color scheme, and with some white leftover vinyl I thought a robot motif would look awfully cute! So I went all out with the bolt pattern through the whole bag 😀 The contrast top and bottom actually repeats in the lining as well, which is also done in two pieces. Then from the seam in the middle there’s a hidden pocket done with one of my favorite techniques!
This type of bag is actually just a flat one with no depth. That’s not usually my taste, but I think they’re nice once in a while, because they’re about the only kind of bag that’s good to hold books in. I don’t know about the rest of you, but when I try to make trips to the library with bags that have depth they just flop around x3

Difficulty:
![]()
The bag itself is very simple, though the straps might be a little tricky.
Makes one bag that measures 16” wide and 14” tall.
Materials & Tools:
• ⅔ yd. of medium to heavyweight fabric for main bag (canvas or denim would be perfect – I used printed canvas)
• ¼ yd. of medium to heavyweight contrast fabric for top (canvas or twill would be perfect – I used plain canvas)
• ⅔ yd. of lightweight fabric for lining (I used quilting cotton)
• Matching sewing thread
• Basic sewing tools (sewing machine, scissors, iron, needles, pins, fabric marker, seam ripper)
• Complementing fabric paint for the robot motifs OR:
Appliqué supplies:
• 12” x 12” scrap of appliqué fabric (cotton, felt, etc. – I used vinyl)
• 12” x 12” scrap of light or heavy duty fusible web
Before you begin:
1. Print out the project pattern here
2. Assemble the pattern pieces, see the page here for more help
3. Lay out the pattern pieces on your fabric and cut them out
4. Mark the fabric pieces with the markings from the pattern
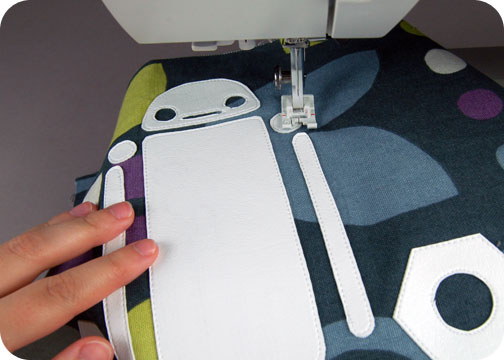
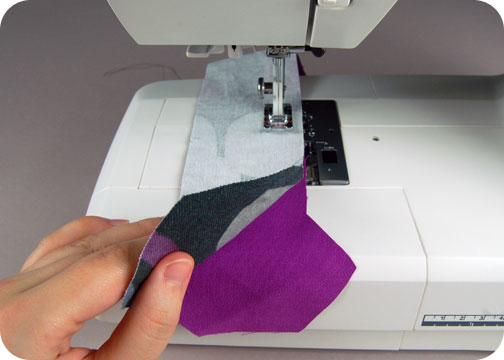
1. Before we jump into the rest of the bag, the first thing to do is apply the robot motifs. If you’d like to paint them on, prepare some freezer paper and see the tutorial I wrote for it. But I opted for appliqué since I had some white vinyl that I thought matched the look I was going for. I fused some lightweight fusible web to it, fused it to the bag following the pattern guidelines, then stitched the vinyl in place with a straight stitch.
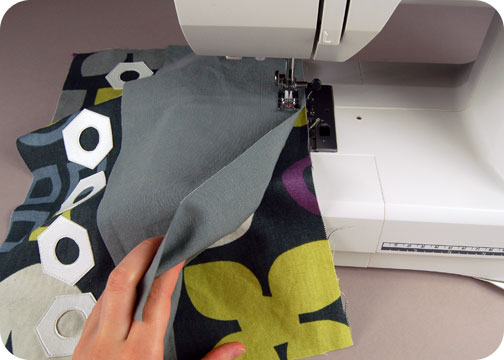
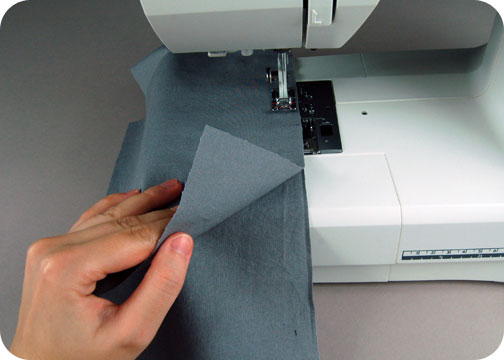
2. Putting together the rest of the bag is easy peasy. Simply line up the upper edge of the bag bottom with the lower edge of the bag top. You’ll know you have it right when you’re able to match up the single notches from the fabric pieces. Sew these in place and press the seam open. When you have that done you’ll want to repeat this with your remaining bag bottom and top pieces that make up the back of the bag.
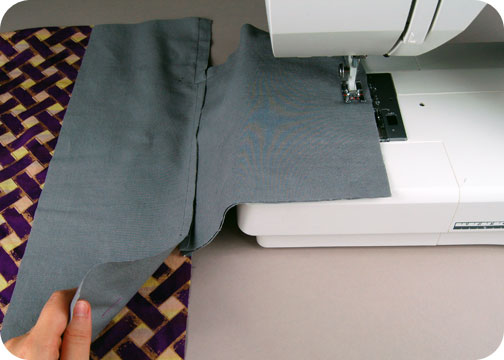
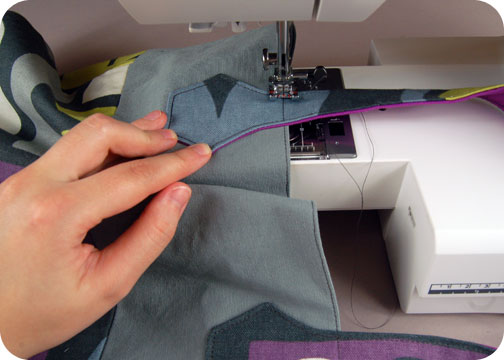
3. The inside of the bag has a hidden pocket that is made as part of the seam. I love the way pockets like these turn out, since they’re hidden within a normal seam. You start this one by lining up one of your inner pocket pieces to the bag bottom piece from your lining. Match up the single notches and the inner pocket piece should be centered nicely in the middle of the bag bottom piece. Using a ⅜” seam allowance, begin sewing ⅝” in from the edge of the pocket, and stop sewing ⅝” before the other edge. Iron the seam allowance towards the pocket.
4. Next we’re going to do the same thing again, but this time take your remaining inner pocket piece and line it up with your bag top lining piece. Stick with the ⅜” seam allowance as before, and also start and stop ⅝” in from the edges of the pocket piece as before. Once again, iron the seam allowances towards the pocket.
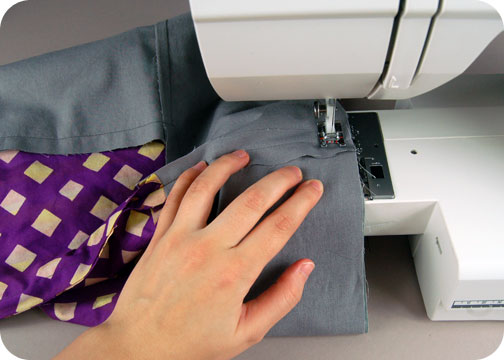
5. To finish the pocket, take the top and bottom sections that you just sewed and line them up together, matching the raw edges from the pocket that extends out as you see in the picture. Sew them together along the edge that joins the top to the bottom, pivoting to go around the pocket perimeter in between. When you finish, press the seam allowance towards the bag bottom and you should end up with a pocket hidden in your seam!
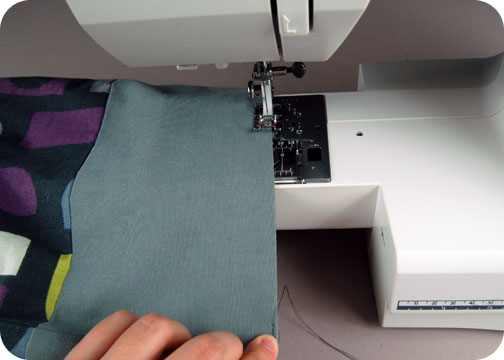
With one side of your lining complete, repeat step 2 for the other side of the lining, where you simply sew the bag top to the bag bottom.
When you have all your sections done, you can sew them together now to create the main body of your bag. Sew your main bag front and back together along the sides and bottom, leaving the top free for turning the bag right side out. Also clip the corners so they turn neatly. Then repeat this with your lining pieces, being sure to leave the opening in the bottom for turning it right side out as the pattern indicates.
6. With the lining and outer bag finished, next you’ll be joining them together along the top edge. Nestle the main bag into the lining with right sides together and line up the top edge. Then sew the layers together all around the perimeter.
When you finish, turn the bag right side out through the opening in the lining that you left. Tuck the lining back into the bag, then even out the top edge and press it firmly so it looks nice and crisp.
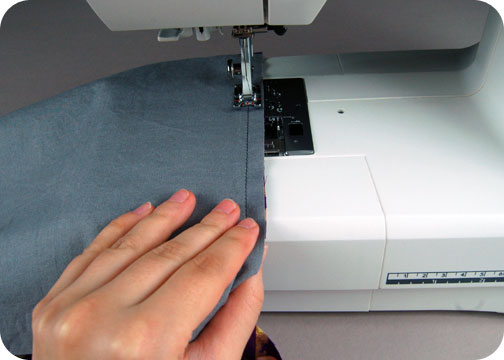
7. To keep it looking crisp, you’ll want to edge stitch around the top edge of the bag all around the perimeter to keep the lining from peeking out.
With this complete, you’ll want to go back and close up the opening left in the lining either with a hand sewn ladder stitch or a quick machine edge stitch.
8. Now to move onto the straps! For my straps I used a contrast fabric on the inside as you can see, but the concept is still the same. Take two of your straps and line up the raw edges with right sides facing. Then sew the two pieces together along the stitch lines according to the pattern guidelines, being sure to leave an opening along one side as the pattern indicates. Trim the seam allowances near the ends to about ¼, and also clip the corners so everything turns smoothly. Then turn the strap right side out from the opening in the side. Repeat this with the other strap pieces to complete both straps!

9. With both straps fully turned inside out, you’ll want to poke the corners with a chopstick or similar tool to make the corners stick out nicely. Also turn under the seam allowances in the opening that you left along the side of the strap. Then press the entire strap so the edges are nice and crisp.
To keep them looking crisp, you’ll want to edge stitch around the perimeter of the strap. This will also close up the opening that you left previously for turning the strap right side out.
10. All that’s left is to attach the straps now! Line up one end of your strap with the one of the front pattern guidelines found on top of your bag. For that little section where the strap overlaps, you’ll want to sew around the perimeter. Overlap the other end of the strap with the remaining guideline on the front of the bag, being sure not to twist the strap in the process. Repeat the same procedure with the other strap and the guidelines on the back of the bag. Now go rock your new robot pal because YOU’RE DONE!
I just love it when a motif comes together like this 😀 And I finally used up all of those fabrics! Destashing for the win >w<
I hope you enjoy making this project, but if you’d rather have the one from the photos, you can purchase it from my Etsy.
And if you do try making the project, I’d love to see it! And I’ll send you exclusive free patterns as a reward!
For questions and terms of use information, please see the FAQ.
3 thoughts on “Freebie Friday! The Bot Bag”
I wish I could post a picture! I made this bag and I totally adore it! I have the motifs in a glowy white fabric with swirls, the outside (no contrast) is a super dark grey and the lining is super colorful fabric. Below is the link to the photo’s. I posted them on facebook, and you can see them there, please let me know what you think!
https://www.facebook.com/MontanaMoore94/media_set?set=a.584709261635597.1073741833.100002895867457&type=3
Aww! I love it! Thanks so much for sharing the photo ♥ I love the colors of the bag, especially the lining 😀 I hope we get to see more of your work in the future! I sent your reward pattern to your email; hopefully you got it okay!
I made this
https://m.facebook.com/photo.php?fbid=716204195152769&id=100002895867457&set=rpd.100002895867457&source=49