
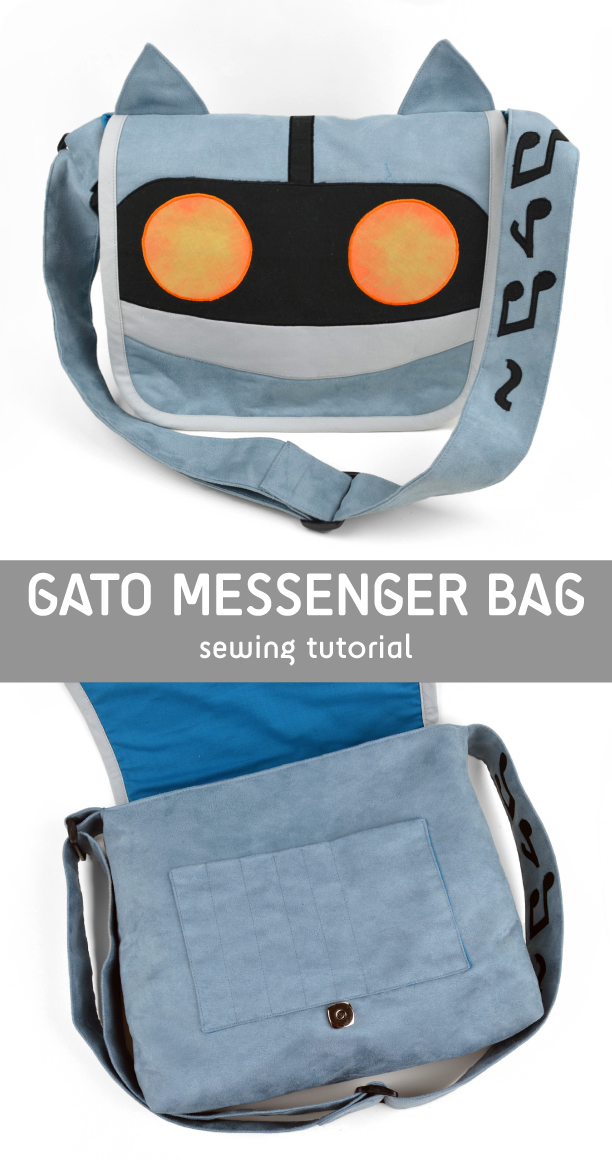
Okay, I have to admit this project is a little obscure XD It’s a present for my amazingly talented best friend; she loves Chrono Trigger, especially the character Lucca. In the game, Gato (Gonzalez in the Japanese version) is a singing robot that provides a little challenge at the beginning of the game. Since Lucca already carries around a blue bag, my friend came up with the design to make it Gato themed instead (though Gato is usually red) x3 I imagine she’ll probably use it if she dresses up as Lucca for Halloween or another party ^-^ If you’ve ever heard of the old SNES RPG I would definitely recommend it x3 it’s certainly one of the many all-time classics out there.
As for the bag, it’s a pretty standard messenger bag, so if you’re looking for that you can simply skip all the additional appliqué and cat ears that make this like the aforementioned robot; it takes the number of steps down a decent bit. I also particularly love how his eyes turned out. They were done with just a bit of fabric paint to give them that glowing effect. Maybe you all might find another application for the technique!

Difficulty:
![]()
This is a pretty basic messenger bag shape, but at 30 steps it has a lot of details (snaps, straps, binding, etc.) that add up.
Makes one 10” x 12” x 2 1/2” bag
Materials & Tools:
• 2/3 yd. medium to heavyweight fabric for outer bag (I used interfaced faux suede)
• 1/2 yd. light to medium weight fabric for lining (I used quilting cotton)
• 1 yd. of gray bias binding (that finishes 1/2” wide)
• Magnetic snap
• About 3” x 3” square of fusible fleece interfacing (optional; see step 5)
• 2” wide strap adjuster (mine’s plastic)
• 2” wide rectangular ring (also plastic)
• Matching sewing thread
• Basic sewing tools (sewing machine, scissors, iron, needles, pins, fabric marker, seam ripper)
Appliqué supplies:
• 1/4 yd. of black appliqué fabric
• 1/8 yd. of gray appliqué fabric
• 1/8 yd. of yellow appliqué fabric
• Orange fabric paint (and paintbrushes)
• 1/4 yd. of 20” wide light or heavy duty fusible web
Before you begin:
1. Print out the project pattern here
2. Assemble the pattern pieces, see the page here for more help
3. Lay out the pattern pieces on your fabric and cut them out
4. Mark the fabric pieces with the markings from the pattern

1. Probably one of my favorite parts of this bag is the cool glowing eye effect that I achieved through some fabric paint. You could easily do this to any bit of fabric that you wanted to have the same look. First, I traced the eye shape onto the yellow base fabric about 1/2” away from the outline so get an idea of where the paint needed to go. Since the lines are outside of the actual eye outline, I knew they would be trimmed away later and I could use a pen to make these markings.

2. Next up we’ll be painting the fabric to get that gradated glowing look. You’ll want to put the fabric on some scrap paper or something because it’s sure to get wet. First off, dampen the main fabric with a bit of plain water (a spray bottle works well here). Then dab your orange paint going from the outside and dabbing more lightly as you get towards the middle. You will likely want to use a pouncing or swirling motion to get a nice blend of paint into the damp fabric. Once you get it looking how you want, let the fabric dry completely. Apply fusible web to the back of the fabric, then trace the eye shapes to the front of the fabric within the outlines you drew in step 1.

3. To finish the rest of the robot face, trace the other appliqué shapes (upper face, lower face, and upper seam) onto the fusible web, then apply the fusible web to the gray and black fabrics respectively. Cut out the shapes, then fuse them to the outer flap fabric as the guidelines indicate. Make sure to layer them correctly too: gray, black, then the eyes last.

4. If you’ve used heavyweight fusible web you can skip this step, but with lightweight fusible interfacing you need to sew the edges of your appliqué pieces to hold them down permanently. I wanted to get a really professional look so I used a satin stitch around all the borders. A straight stitch or a zigzag stitch would also do the trick.

5. Now we can finally get onto the construction of the bag. The bag flap closes with a magnetic snap, so to give it a place to clamp onto you’ll want to fuse a little square of fusible fleece interfacing to the wrong side of the flap lining piece where the snap will eventually be installed.
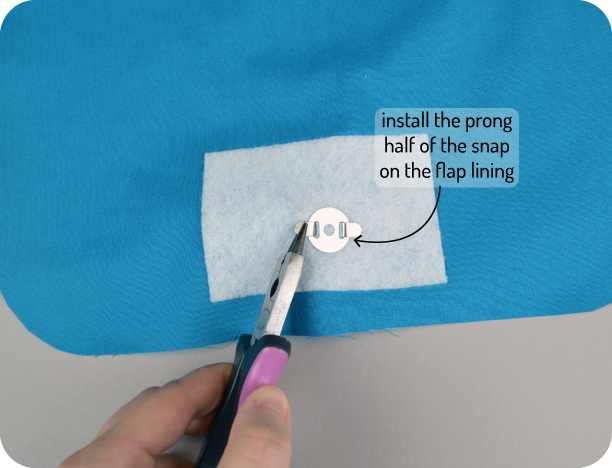
6. Next is to actually install the magnetic snap there. Press the prongs of the snap into the fabric where the pattern guidelines indicate, then snip two openings with your scissors for the prongs. Slip the one half of the snap into the slits and put the base over the prongs. Fold the prongs back over the base with some pliers to secure it in place.

7. With your snap all installed, you can now bring together the layers of your flap. Layer the flap lining and outer flap pieces together with wrong sides together. Baste the layers to make the next step easier for you.

8. Next up is binding the two layers of the flap. I used a French fold binding that I made myself (if you go this route, make it 3 1/2” wide, then fold it in half with wrong sides together), but you can use purchased bias binding as well. You’ll want to line up the raw edge of the binding with the raw edge of the flap and sew it all the way around with a 1/2” seam allowance. Since it’s bias, you can stretch it a bit to make it curve around the rounded corners of the flap pretty handily.

9. After the binding is attached, flip it over to the other side so it wraps around the seam allowance from the previous step. Pin it in place when the back fold just covers the previous seam.

10. To finish the binding, sew along the right side of the flap, just inside the seam from step 8. When you do it should just catch the fold from the wrong side of the flap. Focus on sewing a little bit at a time so you can be sure this is happening while you sew.

11. Now we can move onto the body of the bag! First up is the pocket. To make it up, simply sew the outer pocket and lining pieces together with right sides facing. Leave an opening at the bottom as the pattern indicates for turning right side out. When finished, clip the corners, turn the pocket right side out, tuck in the seam allowances from the opening, and press it flat.

12. Apply the pocket to one of the outer bag pieces (this will become your bag front). Sew around the sides and bottom (this should close up the opening from before), and sew a few lines going down the middle of the pocket too for some pencil pockets. Sew what suits you or follow the guidelines from the pattern instead.

13. Sew the two outer bag pieces together to form the front and the back. Line up all the raw edges and sew them together along the sides and bottom. Leave the corners alone as we’ll be doing those 2 steps later. When finished, press the seams open.

14. To give your bag an extra polished look, go back and edge stitch the finished seam from the previous step. This is especially useful if you’re using faux suede like me, as it doesn’t like to iron flat very well. The topstitching will make sure the seam allowances lie flat.

15. Turn the bag back wrong side out to finally sew the corners. Fold the bag at a diagonal to match up the side and bottom seams. Sew along the raw edges that match in the corner to create some depth to the bag.

16. The outside of the bag is basically done! Now we can add all the extras. First up is the ears. To sew those, simply align two ear pieces together with right sides facing and sew them together along the curved edges. Leave the straight edge free for turning right side out. When finished, clip the excess seam allowance, turn the ear right side out, press the ear, and edge stitch the finished seam.

17. When the ears are done, attach them to the back of the outer bag body, lining up the raw edges and pinning them where the pattern guidelines indicate.

18. Next add the finished flap over the ears. Make sure that the right side of the flap is facing the back of the bag and line up the raw edges. The flap should be centered over the back and likely extend beyond the ears by just a bit. Baste it in place just like with the ears.

19. Now we add the strap; to get it started there are some little note appliqué on the end. It’s just like in steps 3 & 4 where you’ll need to trace the note shapes, fuse the fusible web to your black fabric, cut out the shapes, then fuse the shapes to your strap where the guidelines show. As you see, the shapes need to be off to the side to accommodate how the strap will be folded in half later.

20. When the appliqué is all sewn, you can then fold up the strap. Fold under the long edges by 1/2” and iron them in place, then fold under one short edge (the side without the appliqué) and iron them as well. When that’s done, fold the entire strap in half, matching up the previous folds. Give it all a good iron so all the folds stay in place.

21. With the strap all folded up, sew the folds in place by edge stitching around the strap on each side.

22. The strap tab is done much the same as the strap in step 20. Fold in the long edges by 1/2”, but don’t fold under the short edges. Fold the whole thing in half and edge stitch each finished edge.

23. When the tab is done, you can now attach it to your bag. Wrap it around the 2” ring so the tab is folded in half and baste it to one side of the outer bag, centered on the side seam.

24. The other side of the bag is for the strap. Just like with the tab, line up the raw end of the strap with the remaining side of the outer bag, centered on the side seam. Make sure this is the end with the appliqué and the appliqué is facing the outer bag when it’s basted. And that finishes all the basting!

25. Next up is the lining. This is sewn just like the outer bag, except with an opening in the bottom for turning right side out. Sew the sides and bottom, but leave a space as the pattern guidelines indicate.

26. Attach the lining to the outer bag by nestling the outer bag into the lining with right sides facing. Line up the raw edges along the top then sew around the whole thing.

27. Turn the bag right side out through the opening in the lining and press the top edge nice and crisp. Run a top stitch around the previous seam to keep the lining from peeking out and give the whole thing a professional look. Make sure not to accidentally sew the flap, straps, or ears when doing this.

28. While there’s still an opening in the lining, I added the base of the magnetic snap to the front of the outer bag. This way you can test how the other half of the snap lies when the flap is down. Mine went a little beneath the pocket as the pattern guidelines show, but it doesn’t hurt to check first to see if yours is different. When you have the placement set, install the other half of the snap just like in step 6. When finished, you can now sew closed the opening in the lining, either with a hand-sewn ladder stitch or a simple machine stitch.

29. Last step is finishing the strap! Almost there! With the free end of the strap you’ll need to install the strap adjuster. Shown here is the quick and dirty explanation, though there are loads of more detailed tutorials found throughout the internet. With the finished end of the strap, loop it through the adjuster, then through the rectangular ring, then back through the adjuster just enough to fold over on itself.

30. All that’s left to do is sew the part of the strap that’s folded over on itself. For the most durability, sew a box stitch (square-shaped stitch with an X in the middle) here where the strap overlaps.
And you’re done! It took a while but I hope you’ll agree that the finished product looks pretty professional!
If you do try making the project, I’d love to see it! Send me a photo and I’ll send you exclusive free patterns as a reward!
For questions and terms of use information, please see the FAQ.
2 thoughts on “Freebie Friday! Gato Bag”
this is soooo awesome <3 i love chrono trigger and this bag is such a great idea, i love it as well! really good job and great tutorial <3
Aww ^o^ Thank you so much! And it’s great to see another Chrono Trigger fan ♥